|
Some assembly may be required! updated 1 July 2020 You have bought a well-built and well-designed sailing dinghy. The Wayfarer is also extremely versatile. She provides a challenge to the expert who wishes to push her to the limits. Frank Dye, for instance is known around the world for his Wayfarer exploits which include Wayfarer “Cruises” from the north of Scotland to Norway and to Iceland! Yet the Wayfarer is forgiving and robust enough to tolerate the learning experiences of the beginner. As a new (Canadian) Wayfarer owner, you are invited to join the Canadian Wayfarer Association to our mutual benefit. Please contact Kit Wallace, our Membership Secretary (giving your name, address, phone number and boat number) and he will place you on the CWA mailing list immediately. Upon paying your dues, you will receive all CWA communications (such as the annual wall Calendar). The CWA exists for the mutual benefit of all Canadian Wayfarer owners. We work in many ways to keep our Class strong, active, healthy and interesting to racers and cruisers alike. We are happy to give you any information, advice or assistance you may require. The more basic information is included here in this introduction to our wonderful boat. As your Class Coach, I will be glad to try to help
you with information on other Wayfarer matters, and
there is also a considerable body of useful
information in the Wayfarer
Institute.
Happy Sailing! Uncle Al Al Schönborn
(W3854), CWA Class Coach. GETTING READY Your Abbott Wayfarer comes with everything you'll require to get the boat sailing (except life preservers and beer!) If you have bought a Wayfarer that has been, as they say, previously enjoyed, you’ll need to check that all the bits are there. Other than the boat, you will need the following basics which you should not neglect: 1. RUDIMENTARY SAILING SKILLS:
You should have these available to you - in the form
of a friend who can sail well and goes out with you
until you have learned the essentials, a course, or at
least a book which you have studied in some detail.
Since 2015, my pride and joy, KISS Your Dinghy,
has been available. More here.
2. SAFETY:
Sailing is a very safe sport but all bodies of water
should command our healthy respect. Mishaps of a
serious nature are rare, especially if you use common
sense and obey the law. Both, for example, require
that you have one Department of Transport Approved
Personal Flotation Device (PFD) aboard
for each person while
you are on the water. We recommend a type that you
will feel comfortable
wearing so that you will not hesitate to put it on
whenever it might be prudent to do so. Until such time
as you consider yourself thoroughly competent and have
the experience to accurately assess conditions and
risks, it is a sound practice to wear your PFD at all
times on the water. Please note also the section on
BUOYANCY - which can be a matter of life or death -
further on in this guide.
TO SET UP YOUR WAYFARER 1. PREPARING THE MAST: Bolt the spreaders into their bracket about one third up the mast. There will be three rather lengthy and stiff wires with connectors (turnbuckles [bottlescrews in the UK], shroud plates or ‘keys’). These are the stays. The two of equal length are your SIDESTAYS (or SHROUDS). The other is the FORESTAY. Begin
with the SIDESTAYS. Connect them to the two sides of
the mast at the hounds - about 3/4 up the mast. Now
fit each wire through the outer end fitting of its
spreader. Depending on the age of your spreaders, you
may need to bend one tooth up and the other down
before you can slip the wire in. Then use pliers to
bring these "teeth" back into a level plane once the
wire is in. Other variants of spreaders will have
different methods but they are usually self-evident. STEPPING THE MAST:
Remove the mast pin from the mast step (about 20 cm.
below deck level). Lay the mast along the centreline
of the boat with the foot (wider end) going into the
mast step slot. Line up the hole in the mast with the
holes in the sides of the mast step. Re-insert and
re-fasten the mast pin. Now attach the sidestays to
their plates on each side deck just aft of the
foredeck. If using turnbuckles, make sure that at
least four to six threads of each terminal are inside
the sleeve. Then tighten the lock nuts and add tape
and/or wire to prevent loosening due to vibrations. Now you should be ready to put the
mast into its vertical position, but first:
BEWARE OF HYDRO LINES!!!!!!!! These are practically the sole cause of dinghy sailing fatalities. You must be extremely careful when lifting your mast or when moving your boat around on land with the mast up. HYDRO LINES ARE EVERYWHERE!!! Having checked overhead, one person inside the boat should now be able to tilt the mast into the vertical position. If your boat is on a trailer, it may tip over backwards if you stand too far aft to do this. Forward of the thwart is safe. As you hold the mast vertical, get a helper to fasten the forestay to the most forward attachment point on the bowplate, leaving the one slightly further aft for the tack of the genoa.
SORTING OUT THE OTHER ITEMS On used boats, the items listed below will usually be rigged already. On the Abbott Wayfarer, you will need to take care of the following: The mainsheet blocks: There should be four mainsheet blocks (pulleys). The one with a becket (extra attachment point) should go onto the carriage on the traveller track running across the transom (with the becket pointing up). The other three go along the underside of the boom into the positions indicated in your brochure diagram. ROPES: The longest line (marked MAINSHEET) starts in the becket of the block you attached to the traveller carriage. Use a bowline (knot) to attach. The mainsheet is then fed through all five blocks (end boom, traveller, second from boom end, through the U-strap under the boom, mid-boom block and finally through the swivel-block/cleat combination on the aft part of the centreboard box). Use a figure eight knot as a stopper knot. (b) TRAVELLER CONTROL LINES:
These are the two relatively short, thin lines. Start
these with a bowline knot on the eyes (port and
starboard) at each end of the traveller track - "A"
below. Each line
then runs inboard through its sheave (pulley wheel) on
the traveller carriage (B), back outboard through the
block near the end of the track (A) and finally
through the clam? cleat on the deck. Again use figure
eight knots as stoppers. Cleat in such a position as to keep the carriage
centred in the boat (until you discover reasons to
change its position). BETTER YET: Nowadays (2020),
most Wayfarers by-pass the traveller by means of a bridle. 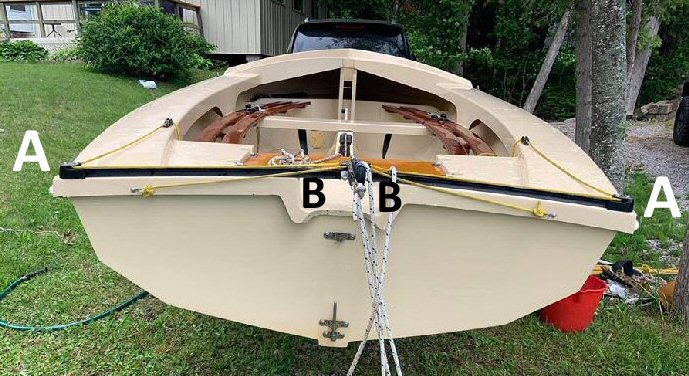 (c) JIB SHEETS: The line marked JIBSHEET will control the clew of the genoa (= jib)(clew = corner opposite the edge that contains the wire). There are several methods of fastening this sheet. The easiest and cheapest is as follows: Feed one end of the rope end through the grommet
in the jib clew and stopper it with a figure eight
knot on the starboard side of the jib. Then lead the
loose end on the port side of the mast, inside the
port shroud/sidestay, and in through the fairlead
attached to the track on the port forward bench. From
there, lead it across the centreboard box, out through
the starboard fairlead, past the starboard side of the
mast (inside the starboard shroud!) and back into the
jib clew grommet (from the starboard to the port side
of the jib). Now stopper this end of the sheet with a
Figure Eight also.
For starters, position the fairlead carriage near the forward edge of the thwart. (d) BOOM VANG: This is important to keep the boom from rising while you are sailing off the wind (especially in a good breeze!) The end with the little plug will be near the boom as the plug itself fits into a slot on the underside of the boom near the mast. But first the other end must be firmly attached to the metal strap on the aft face of the mast near its foot. It is wise - for various reasons - not to hook the vang onto the boom until after the sails are fully raised. The vang (kicker in the UK) wants to be tensioned while sails are luffing. Good form = boom parallel to deck. Overtightening is slow. HIKING STRAPS: These two-inch diameter straps are for your feet so that you and your crew can hang outboard to combat the heeling forces of a good breeze. Be sure to attach them well and check these attachments regularly. You're listening to someone who has gone swimming on a number of occasions after neglecting to check. The
straps attach at FOUR locations: BUOYANCY Abbott Wayfarers (and other glass Wayfarers!) have enough just positive flotation built in to keep the boat from sinking. This is intended as a last resort by which time self-rescue has become impossible. Class
Rules require that the extra buoyancy provided
by watertight fore and aft buoyancy compartments be
maintained as a vital margin of
comfort and safety in case of a capsize.
The wet test is less stringent and easier to
understand but often time-consuming and uncomfortable.
The CWA Measurers can set up facilties for a portable
DRY TEST. Their contact info is listed on line so that
you can contact a Measurer
if interested. Except at Regattas, we obviously cannot
enforce this rule. We do, however, urge that you
ensure that your Wayfarer meets the buoyancy standards
as outlined. Abbott
does NOT guarantee this. So check!
BEFORE LAUNCHING 1. CHECK FOR OVERHEAD OBSTRUCTIONS (e.g. hydro wires, tree branches) 2. SELF-BAILERS: Ensure that these are closed. A four-litre bailing bucket tied to the hull and/or pump are good additional precautions. 3. CENTREBOARD PIVOT BOLT:
You'll find this bolt under your forward floorboards
where it is the most common source of leaks. To
prevent these, we apply lots of silicone sealer under
each washer before thoroughly tightening the nut.
4. CENTREBOARD: Ensure that it is full up and secured to prevent catching the tip as you launch. AFTER LAUNCHING 1. The centreboard is a friction board (via a strip of rubber hose). Test the friction level by moving board up and down in a reasonable depth of water. If it moves too easily (e.g. by itself), push the board to the fully down position and use a long-handled screwdriver to tighten the screws which you will see at the upper edge of the board that is now facing up inside the centreboard box. Loosen if the board is excessively hard to pivot. 2. RUDDER & TILLER: After
launching, hang the rudder, attach the tiller with the
pin provided and with the shock cord to the hook under
the tiller. Ensure that you sail with the rudder blade
full down whenever possible. This makes the boat
easier and safer to steer and saves rudder fatigue.
Breaking a rudder is EXPENSIVE and annoying and can be
dangerous. At your earliest convenience, it is be wise to cover both your wooden foils (board and rudder blade) with a layer of fibreglass cloth which will greatly increase their break-resistance. Click here for more info. ADVICE Once you have become familiar with your Wayfarer,
you will no doubt think of improvements to the basic
layout that will better suit your personal needs and
preferences.
I'm in my fourth Wayfarer (W 116, 852, 4000 and now W 3854) and I am still moving fittings occasionally. I think I have a pretty fine set-up now and have posted rigging advice which outlines certain refinements that are especially good for the racer. Even if you just want to talk sailing for a bit, feel free to call me, Al Schönborn, at 905-844-2150 or e-mail uncle-al3854@cogeco.ca See also 200404: update on Rig It Right courtesy KISS Your Dinghy two-page rig spread from KISS
Enjoy your sailing! You’ve acquired a great boat!!!! |