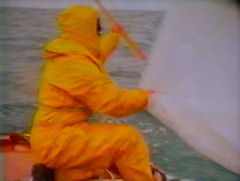
| At age 91, our beloved old salt from Denmark, Ken
Jensen (W1348 Maitken) continues to sing the praises
of Roller Reefing updated: 20 May 2020 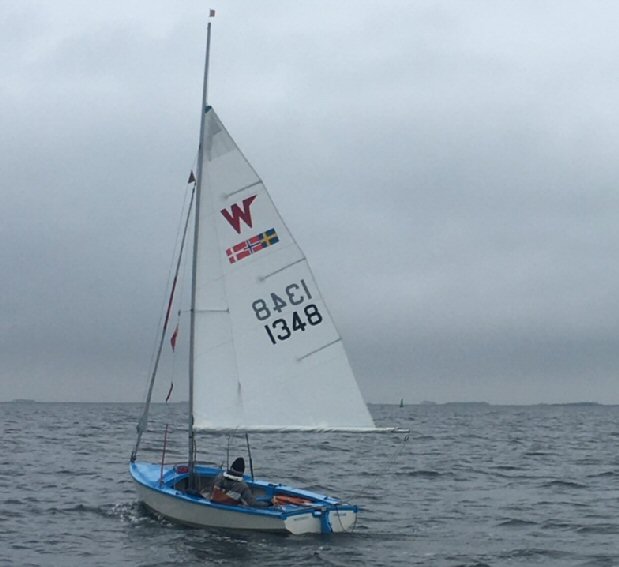 Try getting a jiffy-reefed mainsail to look this ship-shape! Ken out alone 13 Oct 2019 in MaitKen off Copenhagen's Kastrup Airport. |
|
Uncle Al's note: Ken
Jensen has arguably spent more time sailing a
Wayfarer than anyone else in the history of our
Class. Since 1966, in the frequently
windy waters of Scandinavia,
Ken has racked up about
60 sailing days per year, a total of about
15,000 sea hours in W1348
Maitken.
Nowadays, at the age of 91, Ken mostly sails his
Wayfarer - often single-handed as seen above -
in his home waters east of Copenhagen's Kastrup
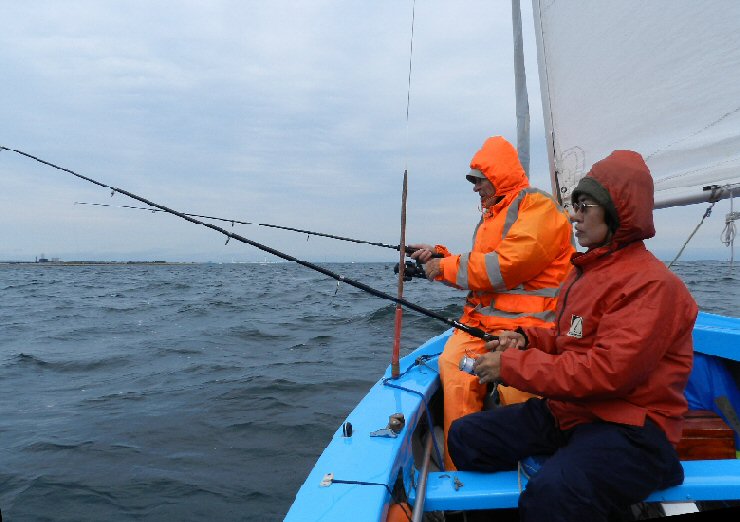
Airport where he - often with La-iad (below) -
does some serious fishing while out sailing. Ken
is the voice of intelligent experience and well
worth listening to!
|
 |
|
Best Wayfarer regards, Ken
Roller Reefing
This is a system that
still works well, a system with no lines or sail
cloth hanging loose and no bungees or sail tie-downs
needed!
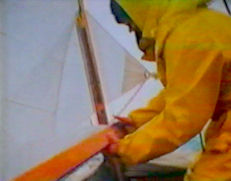   ... 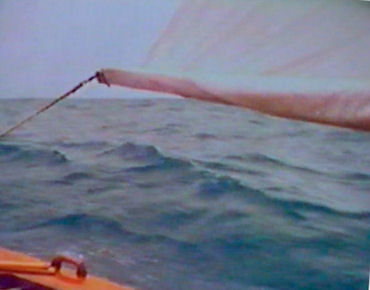  The original Wayfarer
way of shortening sail is roller reefing, the method
Frank Dye used (above)
in the movie Summer
Cruise in 1964. Please remember that
this system pre-supposes boom-end sheeting with the
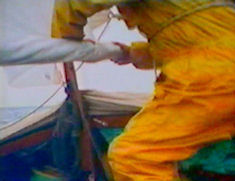
swivel-link at the aft boom-end (above left). These pictures of Frank Dye in W48
Wanderer are
fantastic and historically wonderful,
especially for me seeing also the silhouette
of one of the most windy corners of Norway
(Cape Stadt) where it always blows 8-12 knots
more than anywhere-else on the very long
Norwegian Coast. BUT this has very
little to do with modern roller-reefing, and that
should be quite clear for the reader! Ken
W1348"Maitken"
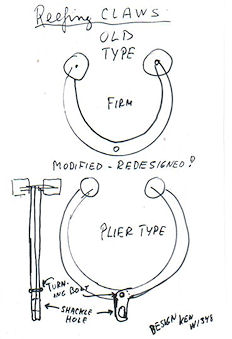
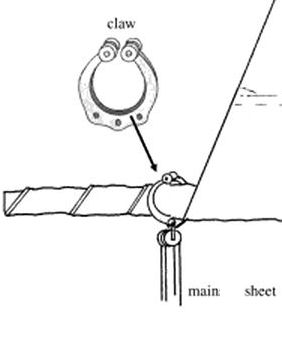 It is, however, also
possible to roller reef with centre sheeting. In
that case, you may need to use a snap/cliphook
mainsheet block attachment that will allow you to
more easily transfer the centre-sheeting block from
a mid- boom-fitting onto a 'plier'-type claw ring (above left) for
easy attachment around the rolled-up sail on the
boom (above
right). (We once used this method on a
German single-chine Pirat dinghy with centre
sheeting that we sailed from Copenhagen to Flensborg
Fjord.)
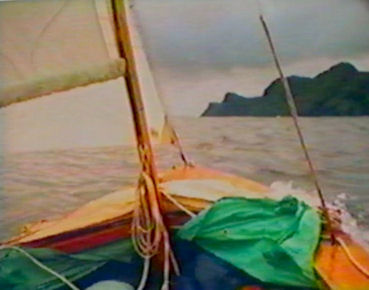
Apart from the relative lack of specialized gear and set-up needed for roller reefing, this method has other advantages: The skipper can tailor the size of the mainsail to the day's conditions rather than being limited to what the sailmaker has provided. Roller reefing - which can be done in under two minutes - with boom-end sheeting will moreover give increased cockpit space (especially with the forward side benches removed and replaced by "seachests" as seen in the picture below). 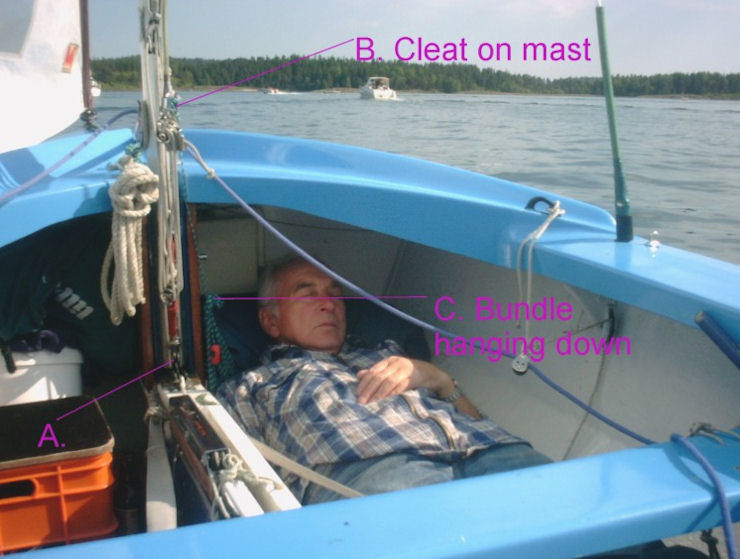 Main halliard
Coiling. After hoisting full mainsail, arrange the
main halliard as shown in the picture above: The
main halliard exits the mast foot (A) and goes up
to be cleated on the mast (B). The halliard has a
marked loose-part length between the cleat and the
green halliard bundle (C) hanging alongside the
starboard king post. This loose-part length has
been made just long enough to
allow
quick, easy and orderly roller reefing to the
lowest batten by uncleating the
halliard from the mast cleat but without the need to
undo the coiled halliard bundle.
If
you have an old-style mast with an adjustable
gooseneck, this system permits you to roll part-way
just to raise the boom (and gooseneck) to make more
head room for yourself and passengers. If a hasty
reef is wanted free the kicker, pull and
cleat the flat/mini
reef line, roll, pop boom onto
gooseneck and tighten the halliard again.
For a short close-hauled sail, there is
little need of the vang/boom-stabilizer, but off the
wind sailing (see # 3 below) the boom
stabilizer should be attached!
For roller reefing past the lowest
batten, that batten must be removed (as Frank Dye struggles to do
above),
and the halliard bundle must naturally be
undone to free up halliard as required to
accommnodate further rolling. (My coil is done in
such a way as to be easily undone with only one hand.
An identical bundle knot is used on the light grey
painter extension hanging to the left of the mast
and down by the king post in the photo above). But
if it gets that windy, it is now time for the solo
sailor to stow and secure his mainsail and hoist
the W-trysail instead.
Roller-reefing
step
by step (explained from the point of view of
a solo sailor)
Al's note: Please note that when Ken talks about being hove to, he means the following: 1. Luff up and ease both sails to stop
all forward movement. When fully stopped with sheets
fully eased, bow about 45° to the wind, put tiller
fully down to leeward, tiller extension also swung
out, so with the lee heeling of the boat it will
remain there for at least some 30-40 seconds. While
moving forward in order to quickly furl the foresail,
I raise the CB at least half way up as I pass
by. This action is done in one 'sweeping'
movement from the time the decision has been
taken. Now I can move back to secure the tiller
to leeward which is quite safe once the boat has lost
its forward momentum with the mainsail luffing and the
boom out at about 45° to the centre-line.
However when
solo-sailing (and always while fishing alone), I rig
my steering line which lets me steer from any
position in the cockpit. (Al's note: you can see an
explanation of this system in the first image of
Ken's Cruising Cockpit Layout page.) With
this line, I can steer into the pre-reef position
mentioned above from my seated-to-windward
position, and then cleat the steering-line to hold
the tiller to leeward while I furl/remove
the foresail and roller-reef the main!
2. Ease off and remove the
kicker/vang from the boom. Remove the tack pin of the
mainsail, and pull/stretch the mainsail footrope as
far out as possible on the boom using the outhaul. To
avoid a drooping boom - less chance of catching
the waves - I also recommend using the Flat/Mini-reef
if you have one, by pulling its line which goes
through a cringle in the leech about 30 cm above the
boom. This goes to a separate cleat on the side
of the boom near the position of the boom-fitting for
the kicker/vang. When pulled hard, this flat-reef line
helps to further stretch the mainsail's new foot.
These actions help you to end up with a rolled
mainsail that is flat and beautiful.
3. On W1348 the outhaul line is
stowed in a neat bundle near the cleat and when
freed, the line is left hanging into the cockpit -
after really pulling/tightening and cleating the
outhaul line. (This line ought to be long enough
for rolling to the lower sailbatten without the
loose end disappearing into the sail when
rolling.) Now take the boom off the gooseneck and
bring that boom end forward to the windward side
of the mast while rolling the sail onto the boom,
easing the main halliard as required
(see Preparations
above, and
previous
set of three pictures of Frank Dye at work).
4(a) With a sliding goose-neck: When the
sail has been rolled a suitable amount, place the boom
back onto the gooseneck and hoist until the boom
is a
few centimetres higher than normal and re-cleat the
halliard. Now tighten the gooseneck screw. Lastly,
take the twisting pressure caused by the rolled
mainsail off the boom by hooking the cunningham tackle
into one of the now empty tack pin holes at the
inboard end of the boom and then adding suitable
tension.
4(b) With a fixed gooseneck: You´ll have to hoist the boom with the rolled sail a little higher than the position of the fixed gooseneck and 'judge-cleat' the halliard to make put a little tension on the main luff when you then pull down on the boom and pop it back onto the gooseneck. It may be necessary to adjust the halliard until you can manage a proper luff stretch and still be able to fit the boom onto the gooseneck. 5. After this, you attach/tie the hanging outhaul-line to the fully freed kicker and pull+tie very tight, before tightening the kicker-tackle properly, thus creating a boom stabilizer - which is not a real/proper kicker/vang but rather a means of keeping the boom from lifting too much while sailing a reach or run! 6. The whole operation is done in the stable position under the luffing mainsail only (see # 1 above), while you are standing to windward by the mast, and it works even in a high wind and a rough seaway - with a maximum of half CB down to create a 'square' drift, creating the 'slick' which reduces the steepness of on-coming breakers (if any)! 7. If even greater
sail area reduction is needed, the lower sailbatten
must be removed. Removing a batten can be
quite tricky for a solo sailor in a seaway! If it
gets that
windy, the best choice is - as previously noted - to
drop and stow the mainsail, and to use the W-trysail
instead.
Wish you all a wonderful W-sailing season. Ken, W1348 Maitken |