| Making the Abbott Mark
III's Aft Tank
Watertight With a View to Facilitating Self-Rescue After a Capsize Alternative Thoughts and Solutions from Richard Johnson and Richard Watterson ... |
|
|
HOW TO
WATERPROOF
THE AFT TANK ON ABBOTT MARK III BOATS (hopefully)
AND
PRESERVE THE
STORAGE SPACE
I have suffered three
capsizes in
Wayfarer 10423, the first was on the inaugural sail
after purchasing
the boat from Abbott, the second a year later; both on
Houghton lake in
Michigan. The first was in around 4.5 feet of
water and after
being unable to keep it righted I simply walked it to a
dock, tied it
up and bailed. The second time I was in deeper
water and finally
after taking the sails down and with the help of a
friendly pontoon
boater was able to right it and was towed to shore.
The third
time was at the 2010 Midwinters, my crew and I were able
to right it
three times only to have it re-capsize each time.
I asked for
help from the wise men of Wayfarers. Richard
Johnson made
suggestions for sealing the aft tank which he maintains
helps
tremendously in keeping the boat floating higher when
capsized and take
on less water when righted. The problem was that
in order to seal
the aft tank I would have a much smaller opening,
reducing the utility
of the compartment. I wanted to keep the opening
near the size it
was, and tried to think of a way to seal it without
closing it down too
much. The Abbott hatch cover was held down with
knobs that rode
over metal beads mounted in the wood cover and
compressed the seal.
The problem with this is that it does not compress
the seal
enough, especially in the front where there is nothing
to compress the
seal. The holes for the bolts that hold the knobs
were not sealed
so water could get in around them as well. I
decided to construct
a new structure that would provide a means for better
compression of
the seal. To do this I would make the opening a
race-track shape
instead of square (think Indy 500 race track). I
would also keep
the bolts compressing the seal outside of the seal and
outside of the
compartment.
|
|
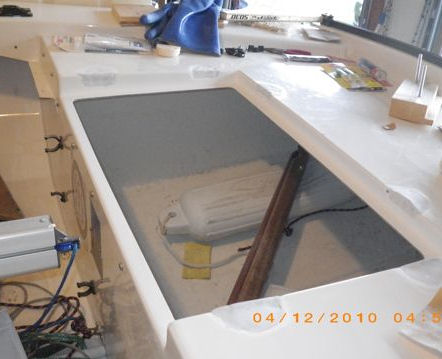 |
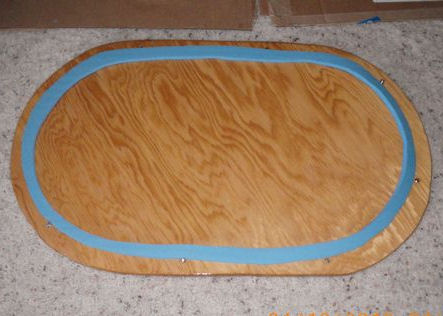
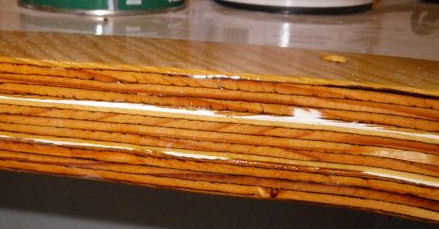
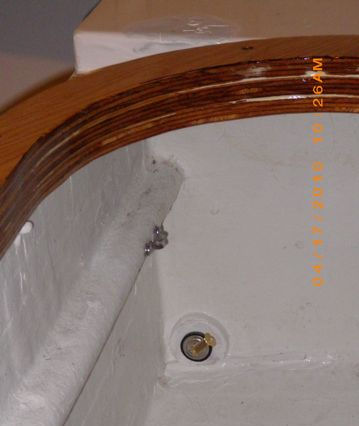
This
is the
compartment prior to modification. The wells that
contained the
knobs which formerly secured the hatch cover have been
sealed with
putty. I used locktite epoxy putty which comes in a
cigar shaped
cylinder. You cut off the putty you need and knead
it to mix the
hardener in and place it wherever you need it. I
have also used
it to seal small gel coat gouges under the boat. |
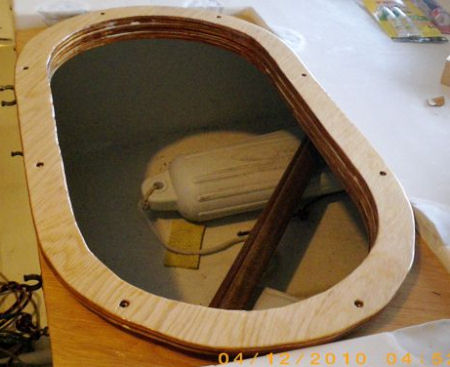 |
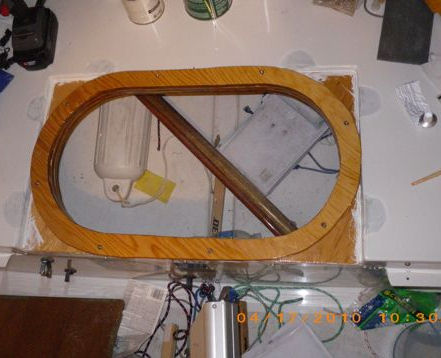
Here
is
the opening. The
modification - made from 1/2" marine plywood - is lying in
place, but
it has not been glued in yet. It is constructed to
lie on top of
the original integral flange running around the
hatch opening. |
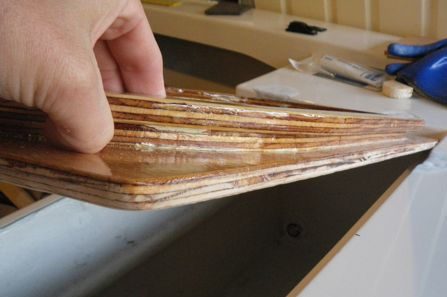 |
This shows the three layers. The bottom piece is cut to fit the existing opening with the oval cut into it. The second layer is a spacer, the third layer is a flange to support the new cover. |
 |
The idea behind using three layers is to keep the bolts and bolt holes outside of the protected space. By layering, any water that comes through the bolt holes falls harmlessly outside the seal. |
 |
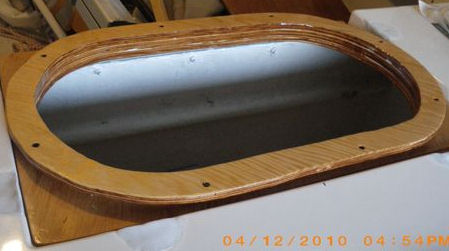
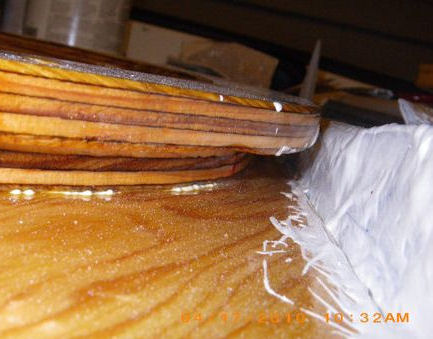
Here is the cover. The seal is made from some foam that is used under laminate floors. It is just the right amount of "squishiness" for this application. Notice that the bolts are outside the seal so any water coming around the bolts will not enter the compartment. |
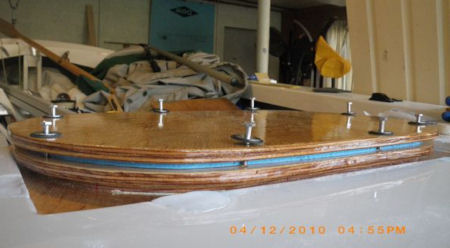 |
I had
to
be careful that the
structure did not rise so high that it would interfere
with the tiller. |
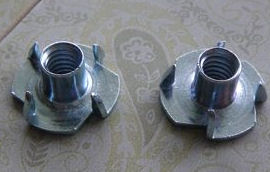 |
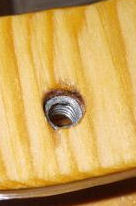
This
is a
view of the bolt
opening and the T-nut. To use these, drill holes large enough for the barrel of the nut to fit through, then use a hammer to gently tap it into the hole. The barbs will engage the wood and prevent turning with the bolt. These stay in place and eliminate fumbling around with loose nuts and washers. |
 |
This shows the three layers. I glued them together using 3M 5200. |
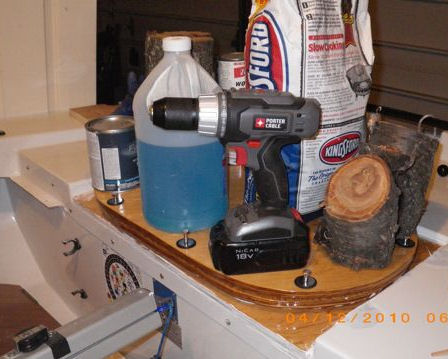 |
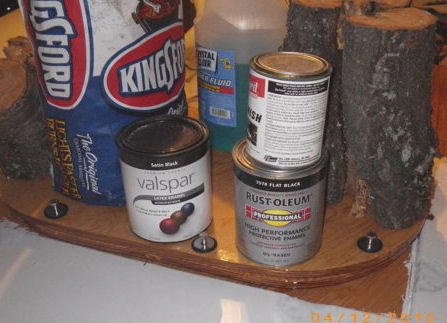
I applied copious amounts of 3M 5200 around the original flange then put the new structure into place. Unable to clamp in place I used the "kitchen sink" method to hold everything down until the sealant could set. I made a complete mess of this, the sealant is all over the wood as well. It is hard to work with the whole structure glued together then placed on the boat. It would have attached nicer if I had just put the bottom layer on the boat then glued the other two to it. I did it this way because I wanted the structure (new stuff) to be sealed together with bare wood as I did not know how 5200 works on varnished surfaces. Therefore I glued everything together first then varnished, then attached to the boat. |
 |
|
 |
|
 |
|
 |
The Abbott Mk IIIs were able to get away with not having a sealed hatch in the back because they took some space on each side of the compartment and glassed in some styrofoam. Their reasoning apparently was that the foam would keep the stern afloat so it didn't matter if the compartment was full of water. A hole was drilled in the bottom corner of these foam compartments. I suppose the hole was supposed to allow water to exit either the between floor compartment to the back or vise versa, I don't know which. If I want to keep the back tank dry then I figured the hole needs to be sealed, but didn't want to make it permanent in case of unforeseen circumstances. The hole Abbott drilled was some weird size between 7/8" and 1", and was not substantial enough materially to hold a stopper in my view. I fixed this by taking some of the scrap plywood and drilling a 7/8" hole in it and shaping it so it would fit in place over the existing hole. I glued this on with 5200 and covered the whole thing with the sealant. Here it is with the plug in place. |
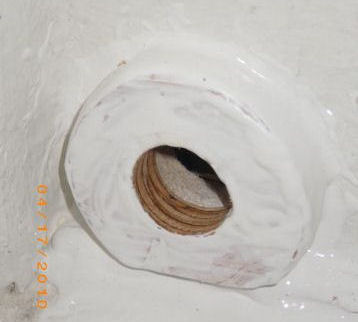 |
Here it is without the plug. The walls of the original hole just seemed to crumbly to sustain a plug. This works very nicely. It is also important to seal around the various screws and nuts which protrude into the aft tank. I bathed these quite liberally with 5200. |
| In
conclusion, my techniques were quite rough due to the
limitations of my
skill and tools. I am confident, however, that the
tank will now
remain sealed and dry when immersed. It does occur
to me that it
will be inconvenient to screw/unscrew 8 bolts to open and
close the
compartment. I'm sure there exists a more elegant
solution to
this. My internet research revealed various cam
locking
arrangements that would have been suitable for this but
were cost
prohibitive. Other people might have more luck
finding something
better. I am considering putting one or two 8"
diameter
watertight hatches into the cover to facilitate quick
access on the
water. There are some really nice watertight hatches
that Hobie
uses on their kayaks. You can find it by going to backyardboats.com
and
search for part 71702001 or browse through their
online PDF catalogs of kayak parts. A 6" version is
also
available. It took 2 tubes (toothpaste style not caulk gun type) of 3M5200, one tube to glue the wood together and seal various through bolts and the modification to the styrofoam compartment holes, and one to attach the new structure to the existing opening flange. After I spent $14/tube for the 5200 at the marine store, I found the exact same thing at Home Despot for $6/tube. ... |
|
| Correspondence
with
Richard Johnson on the subject follows: note that he has
some PDF
attachments on the subject of drain tubes going from the
cockpit
through the aft compartment out the transom. These
would allow
the
cockpit to quickly drain. |
|
|
Dear Richard, Dick and
Al,
I agree
with
Dick, the rear compartment of the boat must be water
tight. Its primary function is as flotation, in my
opinion. If
it can be used as storage, wonderful, but not at the
expense of flotation. I nearly drowned
my poor brother-in-law when we
capsized and the rear compartment flooded.
That is why I took the
draconian step of completely sealing my rear hatch
and installing the
8" water tight hatch in the lid. I can still
use it for storage I
just need to be sure all items are small or in small
packages.
Easy enough. If you go to the Chesapeake Light
Craft Website
they sell water tight kayak hatches. They are
about $150 dollars
and are 16 x 19 ovals. They also have a 16"
circle, I
believe. This would be an alternative and
would maintain the
storage utility but double check to be sure they are
water tight.
In the rear compartment in the Mark III there are two holes bored in the side bulkheads. In these you can see Styrofoam flotation. I have not, but one could put a silicone stopper in the holes. If you go to the US Plastics web site you can buy a variety of silicone lab stoppers. The are very tight and very removable. I do not think the this compartment feeds into the underfloor airtight compartments but they could, so why not. In the
old
Wayfarer Class Rules and Constitution Section
20
"Apertures in Decks and Bulkheads" paragraph
2.9-C
"(Mark IISD/Mark III only) Not more than two inlet
ports each of a
maximum diameter of 4 3/8" connected in a watertight
manner with the
transom by the tubes permitted in rule 15.7."
If you look at the two attachments above you will see one for Stub Ends and a Wayfarer drain tube set-up. The trick to this is to have two appropriately sized ports properly spaced. The material is 304 or 316 stainless which would be fine for corrosion. RJ sales is a going concern in Buffalo NY and they have distributor across the country. They could deliver in few days. The stub ends should be mounted according to the diagram. They would need to have at least 4 screws and should be caulked with a 3m 5200. I believe the holes could be cut with a 4" hole saw blade that could be purchased at Loews or Home Depot. However the holes would need to be chamfered to accomadate the radiused corner of the stub end. Once these are in place in the bulkhead and transom then then they could be connected with 4" pvc pipe which has the same OD as the stub end. the connections could be made with Fernco couplings which can be tightened to the point they are water tight. I know from past bad experience that these couplings can hold up to 30 psi line pressure. More than adequate for our application. So making the assmuption all connections are sealed and the rear compartment is water tight when the boat capsizes and then is righted, with a little down force on the transom the water should leave the boat. All will drain except about 1" on the floor. That is workable though. I have not made this modification myself because frankly I'm afraid to cut into my hull. I would rather do it first on a derelict hull and prove the concept. Or if someone wanted to be first I would be glad to assist. If it worked I think the class should assemble kits and templates and offer them for sale. It would make our boats that much safer. Finally capsizing is like any other maneuver on the boat. Captain and crew have responsibilities. First job is to make sure the other is safe. Once that is done, in our boat, I go for the centerboard. Michele goes for the sheets and makes sure they are loose as well as the bow line. Once we are ready to right, Michele sits on the side of the boat and as I pull up she is rolled on the floor on her back. once the boat is up, then I will go to the bow and grab the bow line and act as a sea anchor. Michele puts up the board and and bails once the boat seems stable then I will climb on. This is not perfect but we have done it twice when we crashed on spinnaker runs. It allowed us to self-rescue. There may be better methods but above all, there needs to be a plan that is carried out very quickly. I hope this helps. I do have one question that I know Al can answer. The rule states 4 3/8" diameter. I take that as in inside diameter of the part not as a diameter of the flange of the stub end. I expect there could be fights about that. But for the class, I would think the more open the better. (Al's note: That would be the inside diameter as you suspected, Richard. Besides which, the Mk III is "our baby", so that we could easily have the Rule changed as we feel is necessary and/or give a dispensation.) I look forward to your thoughts and comments. Richard Johnson W10139 ... |
|
| ... more thoughts from Andrew
Haill (W9657)
whose Mark III modifications are already documented in
the WIT: -----
Original Message -----
From:
Andrew Haill W9657
To:
uncle-al3854@cogeco.ca ; Richard Johnson ; Richard
Watterson W10423
Cc:
Richard Harrington
Sent:
Sunday, April 18, 2010 12:48 AM
Subject: Aft tank
Al Interesting stuff. If this boat is ever thrashed against a rocky lee shore there will be one component completely recoverable... the hatch! As you noted with reference to my WIT submission, my hatch modifications took a slightly less formidable approach. I figured stiffening the edges of the opening, providing a secondary and much wider and resilient piece of sealing rubber, and adding hold down clasps to the unsecured front edge should make a significant improvement, yet still maintain quick access to storage. Seems successful however it has never been tested in anger for very long... a capsized and up again without getting wet above the knees episode a couple years ago had no water enter at all. Although the entire back hatch region should theoretically be sealed I do think Richard Waterson plug improvements to the side foam compartments worth doing. I have always worried about immersion time and getting post-capsize water out of the boat quickly especially on Lk Superior which is lucky to be much above freezing at the best of times. For hypothermia reasons (or alligator bait at the W mid-winters) I thus don't really agree with Richard Johnson's capsize recovery technique ... I'd suggest get back in the boat asap, board up, two people (one balancing, at minimum one bucketing) and get it empty and under control again fast (if a sea anchor is really desired bring another bucket to tie to the painter and throw it overboard). As also experienced by Richard W, capsizes often come in cycles due to instability of the flooded boat... the faster emptied and sailing again the better... and drain tubes should allow sailing off without much bailing at all. I have had a number of discussions with Richard Johnson over the years about through storage compartment drainage tubes (I think he even figured out some of the dimensions for positioning the holes) and I recall a few emails on the topic (some serious and some tongue-in-cheek) have passed through the Whiffle. I like the drainage tube idea, many dinghy classes have transom flaps for capsize drainage (as does now the W MkIV), and it is a bit ridiculous for a dinghy as turtle prone as the MKIII particularly and perhaps the class generally to have to deal with capsize water only with a bucket. But as noted there appears provision in the rules for MkIII connections up to 4-3/8"dia (I'd consider that inside dia) and precedence has also been made with the MkIV so I say have at it. Besides if breaking a class rule helps keep me out of a cold lake then rules are going to be broken. The under floor floatation design of the MkIII does suit drainage tubes better than other versions but personally I think there should be nothing in the rules to prohibit them for any W mark. If the idea of equality on the race course is everyone has to flop about after a capsize for 10mins of bailing then that is a sad state of affairs. My idea is slightly different from Richard J's although same in principle. I intended to use fibreglass tube between cockpit and stern bulkheads. Glassed connections, leakproof, strong, and with a plastic flap on the transom held in place with shock cord. I originally thought about various ABS or PVC plumbing supplies but couldn't quite find fittings and installation atachment that would work. To make it more complicated I was further wanting to install a circular deck plate on the inboard end, the idea being that when one wants to sleep in the boat when cruising a screwed in deck plate would prevent water coming back up the tube when the stern gets pushed down. Unscrew them when sailing again and the drain tubes are ready for action. The original impediment was difficulty in finding a convenient commercial source of thin wall fibreglass tube of roughly the correct diameter. I was going to make my own by wrapping cloth round some pipe but then I bought a keel boat and some of the project focus shifted. On the other hand, I can now utilize sections of Lk Superior that seemed a bit too daunting for the Wayfarer. I
obviously think drainage tubes worthwhile and
would be pleased to
discuss with anyone actually wishing to attempt
it. It is still
on my W modification list. Practically I
would start with the
best measurement layout I could - drill 1/2"dia
pilot holes and use a
piece of say 1/2" copper plumbing tube through
them to determine
adjustments needed prior to saw cutting the final
large dia hole.
Any reasonable layout correction would still leave
the pilot holes
within the larger cutout and the end result will
look precison
based. Connect the holes and you are
done. Go on Richard,
it is only a saw and a hole!
cheers,
Andrew Haill
Thunder
Bay, Ont
W9657
PS I
found one
of the old discussion emails.... attached.
|
|
| for
even more on
self-rescue, check Skills for All Sailors under the heading "Helping Yourself and Others" where self-rescue in a Mark III is dealt with under A Case in Point and Resulting Recommendations |
|