| Making a new
centreboard or rudder by Ton Jaspers ... |
|
The measurement variations of the foils are quite small. Assuming you want to comply with the class rules, the first order of business is to get a copy of the official foil drawings from your association's secretary or chief measurer. Having your boat measured and certified adds to the value of your boat whether you race or not. Please bear in mind that not all class rules are about racing, actually there are quite a few rules that are about safety and for that reason as important to cruisers as to racers. Once you have obtained a copy of the drawing, you will notice it is on non-stretch polyester "paper". So that you can use the drawings correctly, I should explain how a measurer uses the drawings. The major part of the foils has to stay within the drawing outline, allowances are +0 mm and -7 mm. A measurer will place a foil on the drawing and use a square angle to project the foil onto the drawing. You are allowed to shift and turn the foil into what you think is the best measurement position. This means that if your foil is 14 mm too small, you are allowed to shift it until you have 7mm on either side relative to the drawing. A measurer would pass your foil in that case, but not with 14 mm on one side. Next thing to do is read the class rules concerning foils. These rules give you the maximum chamfer, which is not much: 2 inches on a rudder blade, 2.5" on the board. This means you cannot make a true foil, for example a Nacra-shaped foil. The class rules can be viewed or downloaded from any of the Wayfarer association's websites. Materials Uncle Al already suggested mahogany, a very beautiful, easy to work but very expensive solution nowadays. A good alternative is Abachi but that may be too heavy (see class rules on maximum weight of board). I have a board that is made of Abachi and Cedar. Pine may be a little too soft in the long run (not sure). Cedar is light weight and has nice long grain. Abachi provides the stiffness and the cedar brings the weight down. In my CB finishing essay are some pictures that show where the Ibachi is (dark brown parts) and where the Cedar is (light colored wood). The stiff and strong Abachi goes mainly into the leading edge where most of the "work" is done. Alternatively, you can use plywood but only the very best marine quality available. I have seen CB's fail the first time out on the water, after a winter of hard work. The average building ply (waterproof or not) won't cut it. Think of it this way, you and your crew must be able to stand upright on the tip of the CB to right the boat after a capsize. And that is only a portion of the forces a CB has to cope with while sailing. Think of your boat as an aeroplane on its side. Like an aeroplane with only one wing can't fly, a sailboat can't sail without its foils. They are, so to say, your sails under water. A long story but I hope to make it clear that the forces on the foils are about equal to those on your sails. The foils counterbalance the forces on the sails less the crew weight. I am sure you already had the pleasure of discovering what wind can do in your sails. Similar forces act on your foils. This also explains why your foils are just as important as good sails, and I cannot understand the care and effort some sailors put in their sails while totally neglecting their foils. But back to plywood now. Someone suggested to me once to use two half thickness plates of ply and glue them together in such a way that more of the wood grain goes in to the length of the board and less goes grain is in the width of the board. I have never tried this but it seems a good idea to strengthen a CB. Fabrication As stated before, watch the tolerances carefully in everything you do. When using ply, it is a matter of copying the outline from the drawing to the wood and then using a jigsaw. You could use a needle in a cork to punch small holes through the drawing in to the wood. After that, it is just a matter of connecting the dots. Always leave some extra material. Only when the board is nearly finished, do you sand it to its final dimensions. A laminated board is a bit more difficult. You need to glue together a number of strips to avoid warping. I would suggest you use quarter-cut planks and turn the grain of each plank 90º relative to its neighbor. Quarter-cut wood has less chance of warping or developing all kinds of unwanted strains in the wood. By turning the grains relative to one another, possible warp will be counteracted by the neighboring planks. Once the planks are glued together to a board a little larger than needed, it is time to call upon a friendly carpenter to have it machine planed to its required thickness. I would not try to do this myself. A machine does it in a few seconds. Because of this, you should use planks that are a good bit thicker than the board will need to be. As for glue, I would probably go for epoxy but there are quite a lot other good waterproof glues out there as well. Once you have your planks glued together and planed, it is time saw to shape just like plywood. Chamfer The chamfer can be made by hand by drawing a number of helper lines on the wood. These lines are on both sides on the front and the rear. With patience and care you sand carefully to the first lines on the side and front (or rear) of the foil. Once you are happy with the chamfer all around the board you start to sand it to the second set of lines. This process continues until you reach the final line. If I read back the above, I am reminded again why I choose to have a machine-milled board. You can buy ready made boards (ply or planked) from suppliers. Since they all use CNC milling, their main costs are in the finishing. Finishing is mostly labor and therefore expensive. If I look at the cost of the wood, and the time and trouble involved, I would, unless I had some left-over wood available in the shed, buy a ready-made, unfinished board and finish it myself. That is something that can easily be done by any Wayfarer sailor. Finishing Once you get to the stage where you need to finish your foils, please have a look at my essay on that subject here:
I think that covers it, if not don't hesitate to ask. Best wishes, Ton Jaspers (W10445) ... |
| addendum: -----Original Message-----
From: Al Schonborn [mailto:uncle-al3854@cogeco.ca] Sent: woensdag 13 december 2006 2:47 To: wayfarer@home.nl Subject: your foils article ... is posted
in the WIT. I have polished the English a little here and there. Check
it and let me know if you'd like anything changed?
I couldn't
understand the first paragraph under "Chamfer" very well. What I
did with my foils was make - as a W-competitor suggested
- templates for the leading and trailing edges of each foil. I sanded
using a midpoint line for the leading and trailing edge until the
template just nicely would slide along its edge.
That
is what I would call the rough approach. As a model airplane pilot and
builder I use a more accurate methode. First I draw a number of
lines, sort of like the height lines in a topgraphical chart.
Then I start sanding to the first set of lines. When done
sanding starts to the second set of lines, then to the third and
so on. This gives me regular checks about the sanding angle and shape
of the board. Without the intermediate lines some
luck is needed to have the final chamfer exactly as intended.
The lines are on teh sides as well as on the front and back of the
board. With plywood I use the layers of the plywood as height lines on
the front and back and I only need to draw lines on the sides.
Supose
a Nacra foil would be class legal, I am convinced that you need a set
of "heigth lines" to sand a Nacra foil. That and a plywood mold to
regulary check the curvature. Fortunately Nacra foils are not
class legal. We had one boat in our club once. The owner was, like
me, also a model airplane builder. He made some beautiful Nacra foils
for his Wayfarer. His boat was significantly faster then the rest. It
was not just the foils, he also used some other illegal settengs
like his mast was further back then class rules allow. This is why
I know a Wayfarer can be made to go much faster but it is much
more expensive (Nacra) and unsafe. Putting the mast further back makes
a Wayfarer unsuitable for schools and beginners. This is not only
is that against the class rules but also against the the class spirit
IMHO. (A boat for everyone).
In
real life it is far easier to put the board under a CNC controlled
milling machine. Since we use expensive woods the total cost of an
unfinished board are not much heigher then a home made one. CNC
milling is very accurate, much better than we can do by hand. The
finishing is what makes a proffesional board expensive. It takes a
lot of manual labor. By doing the finishing ourselves we can make
a nice profit IMHO. AFAIK every Wayfarer CB source is also willing
to sell us unfinished boards. Other than that finishing a board is
a good excercice that we should master, we need to repeat it every year
or two.....
For the CB,
3/4" diameter, 2.25" long (leaving a quarter inch for the transition to
totally unchamfered). Leading edge was a parabola drawn by a colleague
in our math department, trailing edge was a V (which over the years has
developed a bit of curve after repeated recoatings of epoxy every year
or two)
Just for my mind: that is: 18,9mm -
56,7mm - 6,3mm. Haven't you Canadians gone
metric years ago?
Agree, but don't you sand before
re-coating? A good sand-down should about take away the same thickness
as is added by the new coating.
Same for the
rudder except reduced diameter and chamfer (length 1.75" to allowed for
transition again). I have found that the rudder's leading edge can be
half-round (a semi-circle) and do very well, but not
the board (I tried this and we lost the '76 Worlds because of it: 2nd
to 9th on two medium wind reaches that should have been a parade. It
went fine upwind but we died off the wind every time!!)
I
think for optimal performance the rudder's leading should be
parabolical as well. At least that is what hydrodynamics teach us. But
the rudder has a much, much smaller contibution to the lateral area of
the boat. In other words the effect of the leading edge shape may not
be felt as easy as with the CB. We may be talking about the
last tenth of a percentage here. Maybe the shape of the rudder's
leading edge has so little influence that is hardly matters?
Preparing this
for posting caused me to look at your
other article on re-finishing
again: what a great job you did!! Thanks!!
If you're
reading this email first, get ready for a shock and a laugh when I
forward Ryan's latest email to you.
ROTFLOLPMP
Take care,
Uncle Al
(W3854)
|
| Subject:
Uncle Al's speedy CB entry parabola results from pure bull-shit
luck!!?? Is Milanes Foils the answer?? -----
Original Message -----
From:
alan simpkins
Sent:
Tuesday, December 01, 2009 3:23 PM
I don't want to be pedantic, but in theory it is possible to fit any number of parabolas to connect the centre line of the leading edge and the edge of the chamfer 2.25 inches back. Is the shape of the parabola important, or is it a personal thing - not too sharp and not too blunt? Regards, Alan Simpkins -----
Original Message -----
From:
Al Schonborn
To:
alan simpkins
Cc:
Jesper Friis home ; Jens Konge Rasmussen ; Ton Jaspers (W10445)
Sent:
Tuesday, December 01, 2009 8:26 PM
Subject:
centreboard parabola
Hi, Alan:
I don't know enough
physics to comment. In my innocence/ignorance I asked, in 1975, a
math-teaching colleague to draw me "the parabola" to connect the centre line of the leading edge
and the edge of the chamfer 2.25 inches back to lead to a total max. width of .75
inches. He said nothing about lots of possibilities and came back with
one that I like very much. It wants to be a fair curve and definitely
not too sharp!! Will copy guys who should know more about this and help
us out.
Good luck!
Best regards,
Uncle Al (W3854)
-----
Original Message -----
From:
Wayfarer (Ton Jaspers W10445)
To:
'Al Schonborn' ; 'alan
simpkins'
Cc:
'Jesper Friis home' ; 'Jens Konge Rasmussen'
Sent:
Wednesday, December 02, 2009 4:25 AM
Subject:
centreboard parabola
Hi Alan,
I don't like to answer this type
of questions because they always end in a religious
debate.....
I have observed the English to have a
preference for a sharp parabola where the Danes seem to prefer a blunt
"grandfather's cigar" shape. I
believe the advantage of a hydro-dynamically perfect shape is minimal
and pretty hard to make by an amateur. I suppose it would need
many tests in a controlled environment such as a laboratory tow tank.
At the end of the day only the guys like Mike Mac and Peter Bøje
benefit from it. Us average sailors should go out and sail and
enjoy our boat and not worry about a 0.00001% speed loss. We lose more
ground in that short moment of distraction where we let our sails
flog then by a sub-optimal CB shape. Far more important is to have
a maximal CB area available and the leading edge as far forward as the
rules allow. Check your maximum depth and most important maximum
angle (83 degrees). With that set up correctly, your boat will point
better. There is a nice essay on the WIT about setting up the CB for
maximum performance by Kjell Gjære from Norway: http://www.wayfarer-international.org/WIT/maint.repair.ref/CB.rudder/CB_bolt_hole_location.html
Back to the leading edge question: I would start
with a blunt edge and if it doesn't look nice, even and smooth there is
still some material left to sand some more. If you start with
a sharp parabola there is no more material left to sand. And also, a
sharp edge may damage easier then a blunt edge. It is just a
thought, but until someone comes with a better one.....
Best wishes,
Ton Jaspers (Swiebertje - W10445)
Original
Message -----
From:
Jesper Achton Friis W9355
To:
'Al Schonborn' ; 'alan
simpkins'
Cc:
'Jens Konge Rasmussen' ; 'Ton Jaspers (W10445)'
Sent:
Wednesday, December 02, 2009 6:13 AM
Hello everybody,
My best answer is on the enclosed and very
handmade curve. I am not able to determin the mathematic formula for
this curve but it is perhaps possible.
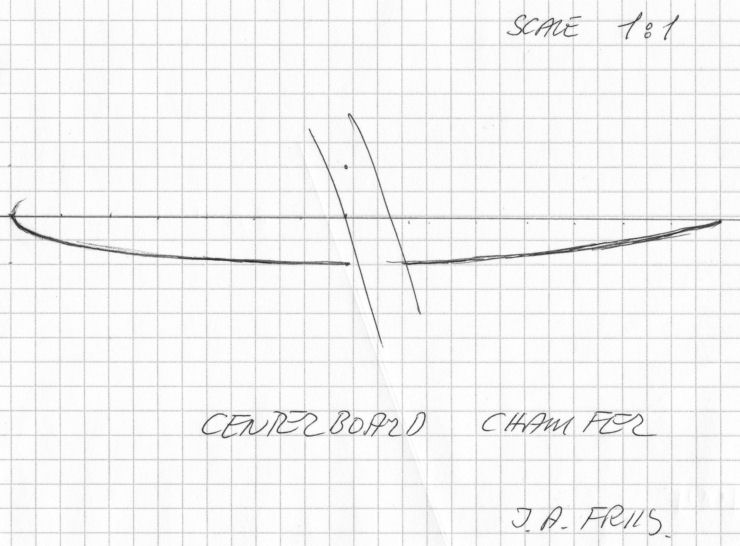 Al's
note: Even I know enough that the scale of 1:1 mentioned by Jesper on
his drawing worked well on paper but not here. I have also posted the full-sized
image
Jesper sent me but on line, the whole thing really depends on your
screen's resolution (dpi). All one can really rely on is that two of
the little squares in Jesper's diagram represent half the board's
thickness, i.e. likely 3/8" or whatever that is in metric.
I have now given up making my centerboards
myself and have started to represent Millanes Foils from the UK. It
is the most sublime craftman's work you can get and the shape is close
to the one I have tried to draw.
If you are interested in Milanes Foils you can
find more information on: mailto:Info@milanesfoils.co.uk
Med venlig
hilsen |