|
Where to drill the hole for the pivot bolt in a new Centreboard?
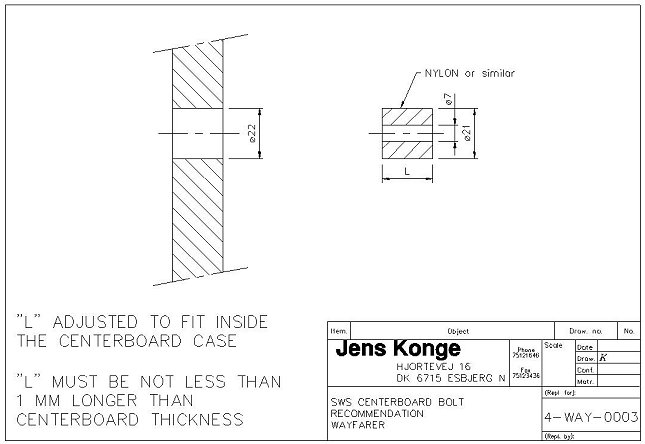
Some time ago I started to install the “Danish insert” in my old centreboard. (See image 1 below and http://www.wayfarer.dk/teknik/klarg_nyt_svaerd.asp#Bøsning)
Image 1 (Al's note: For those few of us not too well versed in the technical Danish required by the above link, let me try to explain the "Danish insert" - shown in image 2 below - and its purpose:
In some - most?? - glass Wayfarers, it is possible to squeeze the sides of the centreboard box together when you are tightening the nut on the CB bolt in an understandable effort to prevent leaks at this spot. This can lead to friction as the box is squeezed up against the CB itself which now becomes hard to raise/lower. Jens Konge Rasmussen cleverly found a way around this problem (image 1 above) by inserting a plastic bushing (image 2 above) that is slightly wider than its centreboard. This bushing will thus allow you to tighten the CB bolt and nut to your heart's content while keeping the sides of the centreboard box off the board itself which will now pivot around the plastic bushing. N.B. Make sure that the bushing fits loosely enough into the hole in your board to allow the board to pivot freely around the bushing, even after you have sealed/protected the hole in your board with epoxy.)
Now back to Kjell:
Because adding this bushing meant making the hole in the centreboard larger, it also let me optimise the position of the hole for the bolt. I got some trial and error advice as to where to drill the hole. This did not work, so I came up with the following method! (N.B. This work should be done with the boat on its side.)
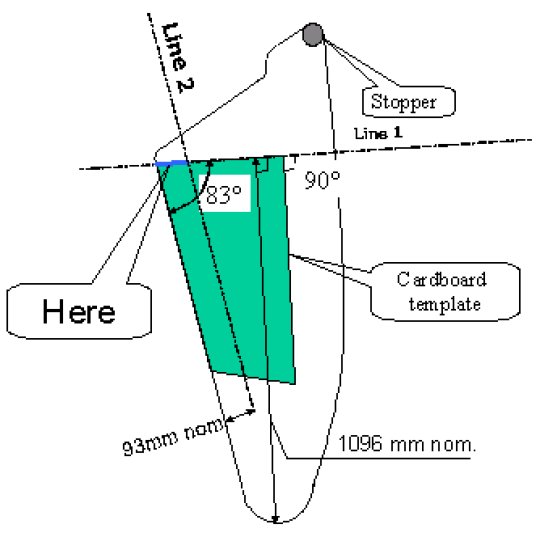
Where to put the hole? You want to find the best location of the centre of your centreboard bolt hole on your board. Unfortunately the position of the bolt hole in the centreboard box varies considerably from boat to boat. So, on your boat, measure the distance from the underside of the keel to the centre of the centreboard bolt hole. The keel bands are optional; do not bring them into any measurement. (This distance will be the 89 +/- 7mm from the lower edge of the centreboard bolt to underside keel allowed by Class Rule 14.3(b), plus half the diameter of an 8mm or 10mm diameter bolt, i.e. a distance of 93 or 94 +/- 7mm from the underside of the keel to the centre of the centreboard bolt. In image 3 below, I have used 93 mm as this value, but you will replace that 93mm with the measurement from your Wayfarer!
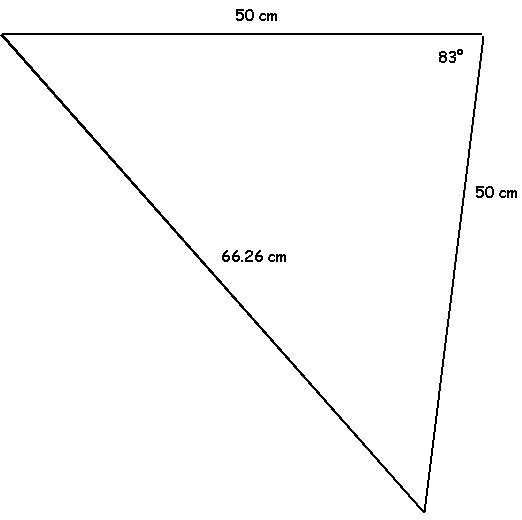
Line 2 in image 3 above, is set parallel to the leading edge of the board at a distance of 93* mm (*or whatever this distance needs to be for your W). Line 1: To facilitate the task of locating this line, make a template from some cardboard. The angles should be 83 and 90 degrees as indicated above. (You get an angle of 83 degrees in a triangle with sides of 50, 50 and 66.26cm - see image 4 below).
To draw line 1, place the cardboard as indicated in image 3 so that the depth of the board reads 1096mm*. (*My value of 1096 mm was computed this way: According to rule 17.9, minimum depth is 965mm, maximum is 1008mm. To be on the safe side of the rule limits but give the board close to maximum exposure, I chose 1003mm. Now add the distance from the keel to the centre of the centreboard bolt and you get: 1003 + 93* = 1096mm - again, replace the 93 mm with the measurement from your Wayfarer)
Rationale: For the board to reach 83 degrees and the correct depth, the centre of the centreboard bolt (hole) must sit along line 1 between its intersection with line 2 and the leading edge of the centreboard. If we put the centre of
the bolt hole right at the intersection point of the two lines, the
board will sit as far forward in the boat as possible when down.
When up, the board will then be flush with the keel but will be
susceptible to damage when trailing, hauling out or hitting the sea
bottom. A hole closer to the leading edge will bring the
board correspondingly further aft and further inside the box when the
board is fully raised. Personally, I selected a position 83mm from the
leading edge. This leaves the leading edge of my board 10mm above the
lower edge of my keel when the board is raised, i.e. I will have 10mm
of protection. Once you have made the hole and inserted any bushing you may wish to add, put the board into the boat. Now lower the board until your cardboard template indicates that the board has reached the maximum permitted 83-degree angle. With the board down at this angle, make a hole for the stopper so that the stopper will leave the board in its proper 83-degree position when the board is fully down. You will almost certainly need to add a “horn” (a class-legal addition to the standard outline of the board - see image 3) to be able to place the stopper in the desired position. Such an extension to your board is fairly easy to make at home.
And there you are - finished!
Kjell Gjære (W4878) with good help from Uncle Al and others. Oslo, Norway. June 14th 2005 kjgj@online.no http://home.online.no/~kgjaere/wayfarer.htm |