|
Upwind sail tuning made simple (if not necessarily easy) by Uncle Al (W3854) printer-friendly PDF version available: click here |
|
Introduction:
This was meant to be a short, little blurb written for some guys on the
CL
Users Forum who, in the topic Magic
Box, got into the confusing complexity of tuning options. Man, I
thought, it's a whole lot simpler than that on our boat:
And Bob is indeed your Uncle!
It is, in essence, that simple. But as you will note, it's the
rationale that takes up space. And then, of course, I decided it needed
illustrations. So now we've ended up with this. I do hope you find it
useful.
Best wishes for happy sailing, Uncle Al (W3854) ... |
|
Keeping things in perspective. Rigging - both standing and running - exists
only to be the servant of your motor, the sails. So, when you see/hear
tuning
numbers, always keep in mind that these are meant as a means to an end
rather
than a goal in themselves. On a racing sailboat, be it a dinghy (my
area of
expertise) or a keelboat (a black hole in my knowledge), our real and
only goal when it
comes to tuning is to keep the sails up and properly set to take best
advantage
of the wind.
... |
|
Sails - general
principles. Like
the wings of a very slow-moving airplane, your sails are curved fore
and aft,
so that air flowing over them generates lift towards the outside of the
curve (below).
 Your sailmaker builds a certain amount of smooth curve into each sail. The depth of this curve will vary somewhat from class to class and from sailmaker to sailmaker, and on our boat, is something that we no longer worry about trying to influence except insofar as we use vang tension to bend the mast and thus flatten the mainsail when we are overpowered. 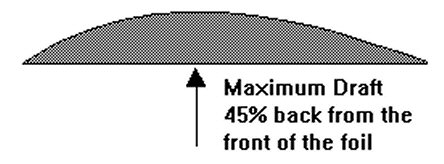 The designed fore-and-aft position of the area of maximum draft depth in sails is usually from 40 to 50% aft from the luff (above). Various factors affect the maximum draft location, but for basic tuning you can ignore this except as specifically addressed later in this guide. Note my attempt at diagramming below where I try to show various places the max. draft can end up to due to rig settings and/or wind friction. 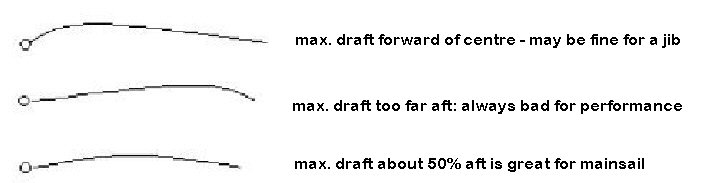 In
essence, all you need to do is
try not to screw up the intended shape more
than necessary. How do you get and maintain the optimum shape in your
sails? Mostly you will do this by adjusting - in very simple ways -
their leading and trailing edges, i.e. the luff and the
leech. Details to follow in a moment.
...
|
|
Getting underway: Before
we sheet in and start sailing, we
will ensure that our sails are properly
hoisted. This may seem obvious but when I look at other boats sailing around me on any given day, some
review appears called for. After all, we have to give our sails a
chance to perform correctly. A guitar player may well do all the
pickin' and
grinnin' to perfection, but if (s)he starts with strings wrongly
tensioned, it's not much
good.
First, we need to ensure that
each
sail is hoisted fully, to the extent that there is no excessive slack
in the luff
of either sail.
We must however, be equally careful not get carried away: we must not
stretch the luff, either, as this
will put too much fullness into the leading edge of your sail,
especially in
light air. On SHADES, we
actually always hoist our jib first, but here, the layout necessities
require me to begin with ...
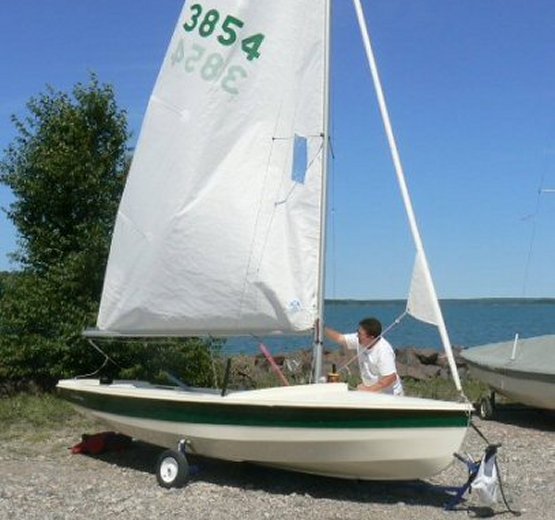
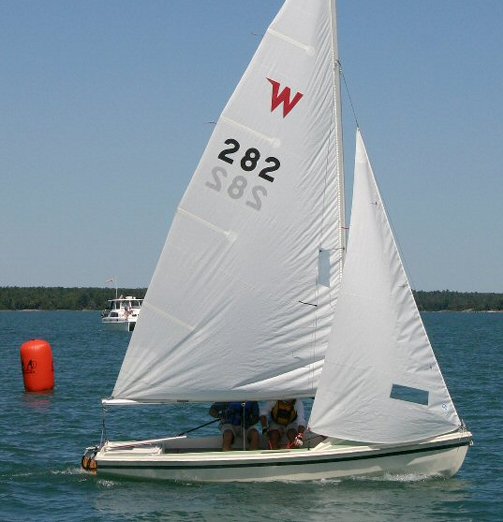
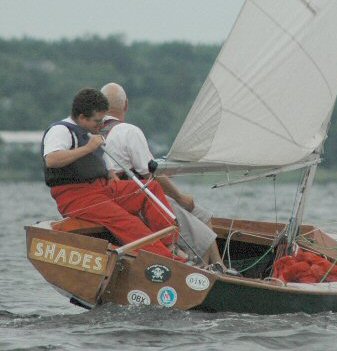
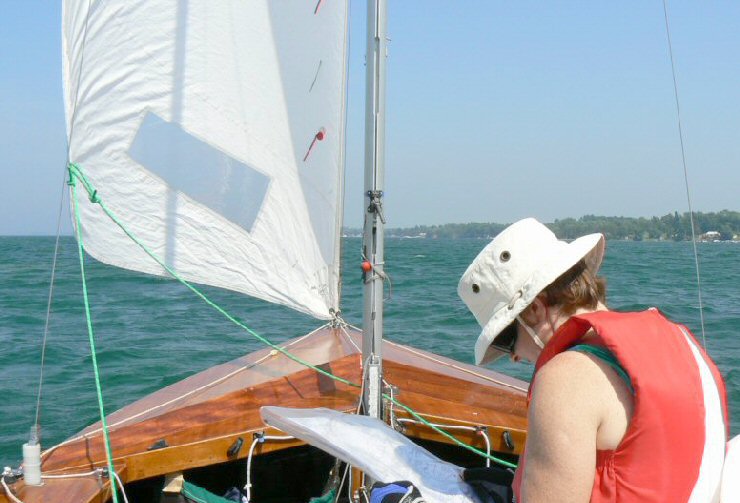
 the main: Hoist the main to the
limit band at the mast top, and then pop the boom back onto the
gooseneck. If you now see stretch bulges in the luffof the main along
the mast (like what you see if you stretch a piece of cloth,or in the
photo on the right where Three Gawthrop has not yet eased his main
cunningham after that last windy beat), raise the gooseneck or back
off the main halyard until any sign of such stretch disappears.
 Usually,
there are small wrinkles where the luff bolt rope sleeve meets
the
sail cloth. Those wrinkles that Marc is admiring above, "speed
wrinkles"
in Wayfarer talk, need to be left
in, at least when you're deciding how high to hoist the main. If they
have been smoothed out, your luff is
too tight (even though it may
look nicer unwrinkled!)
 The
jib is a bit trickier: on our Wayfarer, we have a jib luff wire that runs down a
sleeve
in the luff and that usually takes over forestay duties once the
halyard is
tensioned for sailing. The
head (top corner) of the jib is lashed to an eye at the top end of this
wire.
 The
bottom of that sleeve used to be lashed to an eye at
the bottom end of the luff wire, but it was discovered that, over time,
the
sail cloth shrank. As a result,
the cloth along the luff was being forced to stretch when the luff wire was put under
suitable tension,
giving
stretch bulges (see photo above) along
the luff which are seriously detrimental to performance (much of the
time).
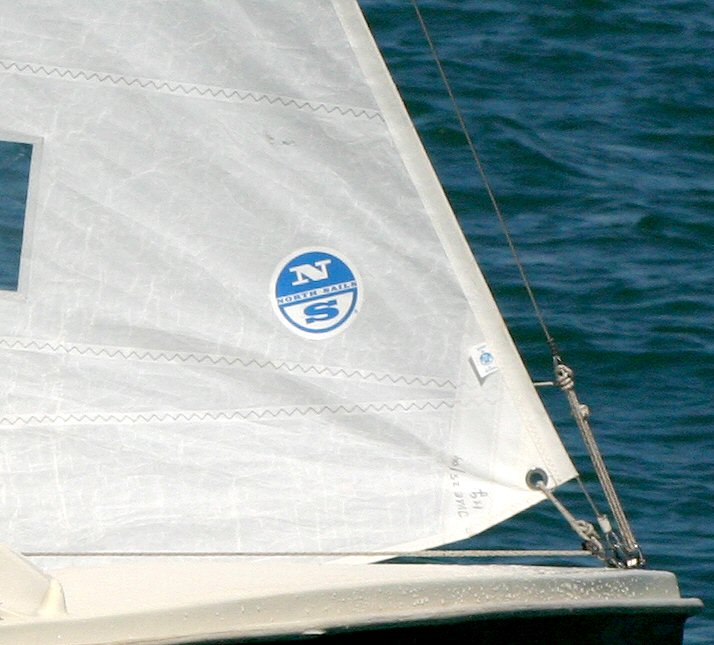
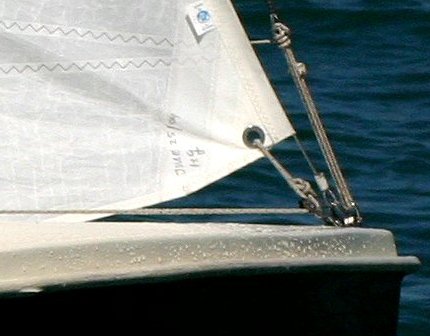 What
most of us do these
days to avoid this potential problem, is leave the tack (bottom front
corner) of the jib loose (above),
i.e.
not lashed on to
the wire eye. For us, there is thus a very definite distinction between
jib halyard tension and cloth tension in the leading edge of the sail.
And most of the time, the luff cloth tension is virtually nil!! To keep
the cloth from riding up excessively, we use a grommet (above) in
the tack of the sail through which we run or tie a thin line (above).
 That
line (speckled white above)
is called the jib
cunningham. As you can see here, we have the line dead-ended at deck
level.
Then it comes up through the tack grommet, down to a mini-block, and
back to a cleat on the deck beside the mast.
 Again,
do not tension this except to remove the worst of the wrinkles from the
luff - but do keep some speed wrinkles (above).
 Often,
my crew, Marc, and I take turns helming our Wayfarer in alternate races
of
regattas. When he helms, he has me ease the jib cunningham in lighter
winds
until the (fairly stiff) cloth of the luff is a veritable zig-zag as it
goes up the
luff (see photo above). That
is too loose for my taste, but the helm needs to be comfortable, so
I don't argue the point - especially since he wins almost every race he
helms.
Remember the sailor's most useful saying: "When in doubt, let it
out!" Ask the sailors at the 2006 PMG Can Am Regatta, and I
think they'll tell you that a luff
less tensioned helped a lot.
|
|
Well, that just about gets us
set to sheet in and go - except for a few small bits of review that
will
explain the logic behind what we are about to do:
Basic assumptions made by your sailmaker: 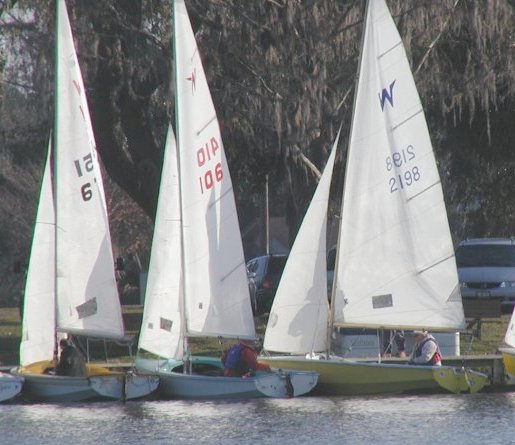 Your sailmaker assumes that: 1. Your mast does not lean
excessively to one side or the
other (i.e. stays are of more or less equal length) but that it is leaning slightly
aft
(raked) such that, with the main and jib properly hoisted, but without
any
mainsheet tension, your boom hangs more or less level, i.e. parallel to
the waterline (above).
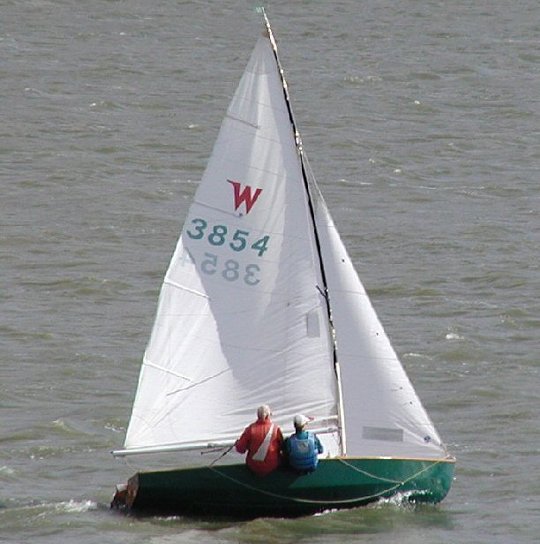
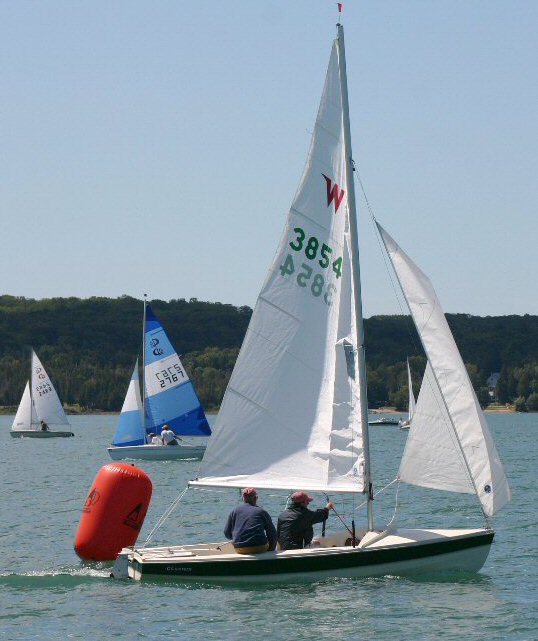
  2. on a dinghy, your
jib luff will
sag a certain amount
(2 - 3" in
a
Wayfarer or CL)
at mid-luff in
any
amount of breeze (photos above: front view, then side
view). This is because the luff is
supported at only two
points: the tack and where the halyard enters the mast. Your jib luff
is
cut to anticipate and match this sag, i.e. you will see a slight
concave curve in the luff when you lay the jib flat.
 3. Similarly, the
assumption is made that, as the wind gets up, the mast
on a dinghy will unavoidably bend (2 - 4"/5 - 10 cm or so on a
Wayfarer, more if
you let it) (above). Your
main luff therefore has been cut with extra cloth
(convex curve) in the leading edge to match whatever mast bend is
normally
expected for your type of boat. Your job thereafter, is to keep the
mast from bending much more than that, if possible.
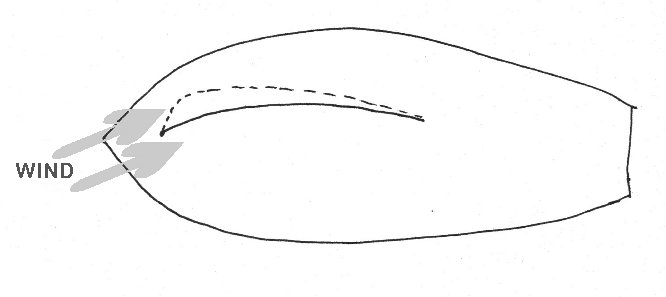
Other basics regarding sail shape and function: 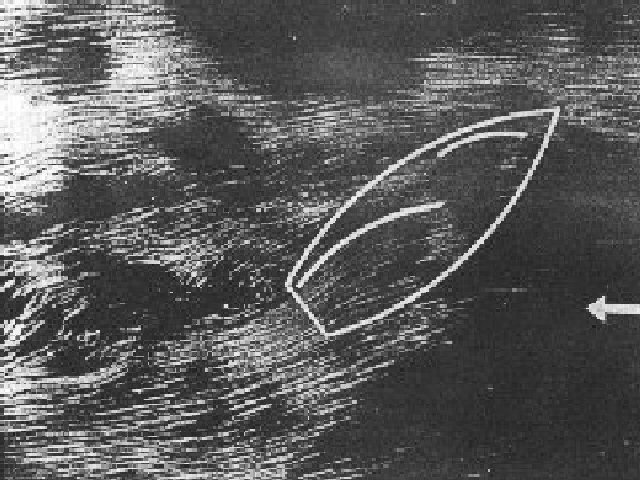 The above image has
been borrowed from the late Eric Twiname's
wonderful 1973 book Start to Win. As I recall, they
sprinkled aluminum dust onto water in a test tank with the current (to
simulate wind) running from right to left (see arrow). Foils were then
inserted to
show how the air particles that make up the wind (represented by the
aluminum dust floating on the water) flow over a sail. As you can see
from my attempt at a
diagram below, for a sail to work efficiently, its leading edge must
meet the wind head on, i.e. the leading edge of
your sail needs to be exactly
parallel to the wind, so that the wind can flow easily along both sides
of your sail.
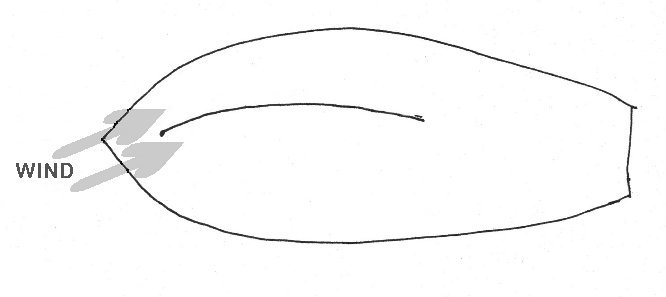 If you point too high,
your sail starts to luff because the wind is
blowing in
at an angle from the leeward side of your sail. Worse, if you point too
low for
your sail set, the sail does not luff but does lose vast amounts of its
lift
because the wind is blowing in at an angle from the windward side of
your sail and thus cannot flow properly over the leeward side which
is the side that generates your lift (= power).
This is known as stalling out, something that causes planes to crash.
(Once more: When in
doubt, let it out!)
The groove. The more rounded
(amount of fore/aft curve) your sail's
entry, the more forgiving your sail will be of less than perfect
angling to
the wind (be it due to inexperienced helmsmanship or bouncing around in
waves or whatever). The
amount
of this entry curve is directly proportional to the amount of jib luff
sag you choose to sail with:
more sag = a more rounded (fuller) entry, and vice versa.
On a Wayfarer
or CL, the amount of luff sag is directly
proportional to and controlled by the amount of
jib
halyard tension. Thus, the tighter the halyard, the flatter the entry
becomes, and
vice versa. So, if you ease the jib halyard, your jib luff entry
becomes more rounded, and what is called your steering
"groove"
becomes correspondingly wider
(more forgiving of imperfections in angle of your sails to the wind).
Thus,
an expert helmsman sailing in a very steady
wind on flat water can get away with a flatter jib luff entry, i.e.
sail with a
narrower groove, than a beginner struggling in big waves or very shifty
winds.
 You may well be asking
at this point: "So why not sail with a wide
groove
all
the time?" Well, remember that you have to steer your boat such
that the wind meets the jib luff entry head on. So the trade-off is
that a more rounded entry (see
dotted line above),
forces you to sail more off the wind in order to give your
sail entry a functional angle to wind, i.e. the lower
you will point. Thus, it pays to sail with the
flattest jib luff entry you can get away with. But here again, it is a
case of when in doubt, let it
(your jib halyard) out. If SHADES does
not feel right going upwind, the first cure we always try is expanding
the "groove" by
easing the jib halyard and thus increasing entry curvature. (On a
keelboat with the jib
hanked on to the forestay, you may well have to ease the jib sheet a
bit to
make your
entry rounder?)
...Note: Keelboat clarification supplied by Andrew Haill to fill the above gap in my knowledge: -----
Original Message -----
From:
Andrew Haill
To: Al Schonborn
Sent: Tuesday, March 27, 2007 2:43 AM
Subject: upwind
sailing
... "On a keelboat with the
jib hanked on to the forestay, you may well have to ease the jib sheet
a bit to make your entry rounder?". I'm far
from an expert but at least on the keel boats I've
sailed, one still uses the halyard to alter genoa shape along the
luff, the sheet has a secondary effect on it, but it is mostly halyard
tension and the sheet used to determine angle of attack and leech
tension albeit with some effect on entry shape. Backstay will
tighten up the overall jib sag as well, which is fortunate because when
you want backstay to flatten the main as the wind builds, you usually also want to reduce the
headsail sag. It is still the halyard tension however, that
really affects how round the entry is and how hard it is to go upwind
in the groove. Every control on a boat seems to
have one main purpose and at least one secondary effect, but
that's half the challenge cause it would be pretty boring if there was
just one go-fast rope to pull.
cheers
Andrew
W9657
|
|
Next, we'll talk
details about the inexpensive
"instrumentation" that will easily tell
you if your entry is too flat.
Setting the groove for upwind work in the day's conditions: Let us
assume a nice medium breeze of 5 to 8 knots. To set up for existing
conditions on our Wayfarer, we deliberately crank up jib halyard
tension more than we expect current wind strength to support, i.e.
until we
reach a point where we think we'll have less jib luff sag than our
sailmaker anticipated. This in turn will make our entry curve too flat,
and the
steering groove too narrow, for the
conditions.
Now comes the acid
test: We sheet in and sail closehauled. I'm assuming
here, that everyone knows how to sail to the ticklers. Most good racers
usually point up
until the ticklers on the windward side of the jib angle up 30 to
45° (see Mike McNamara diagram
below). This has two benefits: 1. It lets us point that little
bit higher (pinch), and 2. it keeps us well away from the dreaded stall.
 If the jib
luff cloth actually begins to lift (luffing), we know we are too high,
but
if the
leeward
ticklers start lifting or, God forbid, going in circles, then we are
sailing
too low (stalling out).
Identifying a jib luff entry that is too
flat: A
sure sign (on fairly flat water, anyways) that the
entry is too flat due to an overly tensioned jib halyard, is ticklers
that are jumpy: from one second to the
next they
switch from indicating luff to showing stall, sometimes both at
once. If this totally unacceptable state of affairs exists, we
start easing our jib halyard in small increments to make the entry
rounder until the
ticklers
settle in such that the jumpiness disappears. At that point, we have
theoretically got our jib halyard tension (and its attendant entry
curve and steering groove) to its optimal setting for the
conditions. And, we have set
the correct rig tension at the same time, since the jib halyard/luff
wire combination is deriving its tension by pulling against the
resistance of the shrouds (remembering that on dinghies, the forestay
is set loose enough that its function of holding up the mast is taken
over by the jib halyard almost as soon as the jib goes up).
If the wind increases,
we will add halyard (and rig!!) tension to counteract
the increased luff sag caused by the extra wind pressure, and vice
versa.
Always
though, the ticklers are our instruments that will tell us when the
entry is
too flat. If they start to get twitchy, we ease off some halyard. Alas,
there
is no direct way to tell if the entry is fuller than
it needs to be. To be sure that you have it as flat as you can get
away with, you need to overtighten and then ease off as much as is
necessary. Eventually, you'll reach a point where you'll pretty much
develop a feel for an amount of halyard tension that is "in the
ballpark" for
existing conditions - a
useful skill in mid-race where overtensioning and then easing off as
needed, are not an attractive option. There, your best guess is really
the only
way to go. If the ticklers get antsy, you'll know you've got too much
halyard tension and will need to have your crew ease the halyard a bit.
That having been said, we often find that even though the tickers
do seem to be behaving well, the boat still feels a tad slow. In that
case, we are in doubt
and so we let it out (the jib
halyard).
Almost invariably that helps -
perhaps only
psychologically, or because the boat is just that little bit easier to
steer within its expanded groove.
One quick
example to show the importance of a comfortable
groove: We once sailed a 1992 Wayfarer Worlds qualifier on Lake Ontario
in a
nasty
cross chop of large leftover swells from an overnight SE gale and the
new waves from
a southerly wind of about 10 knots. By the time we had eased the
halyard to
give us some semblance of well behaved ticklers, the middle of the jib
luff was
hanging a good 9 inches to leeward of our slackless forestay - talk
about luff sag!!! We pointed lower
than all the others who were sailing with tighter halyards but we
absolutely
axed them on better boat speed (which in turn makes your board more
effective
so that
we didn't even end up losing much distance to windward).
What about the mainsail
entry, I hear you ask? Well, luckily for us
non-high-performance dinghy sailors, only easily adjustable mast bend
would force us to distract ourselves by trying to fit the mast to the
main's basic, built-in entry
shape. So we can happily ignore that as being immaterial for the
moment, since we have no such facility on a Wayfarer or CL. In
the
early 90's, I
actually did figure out a way to pre-bend my Wayfarer mast relatively
easily for really light airs, but doing so seemed to make no difference
to our
performance, so that I now ignore the main entry with no noticeable ill
effects. The KISS principle in beautiful action!! Note: We will talk
about using the main cunningham at the appropriate time later in this
guide.
So, having set the jib
entry to our satisfaction and left the main
entry unfiddled, we can now turn our attention to the sheets and how to
use them to set our sails at the desired angle to the wind.
... |
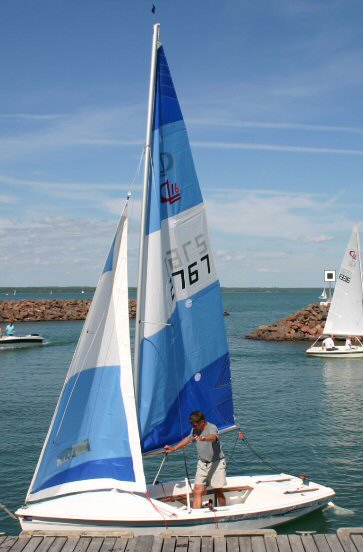
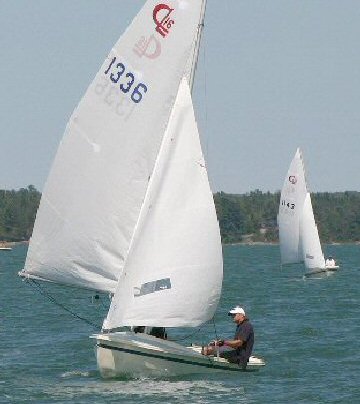
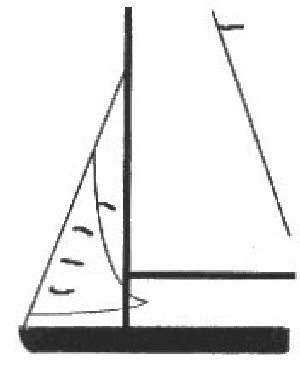
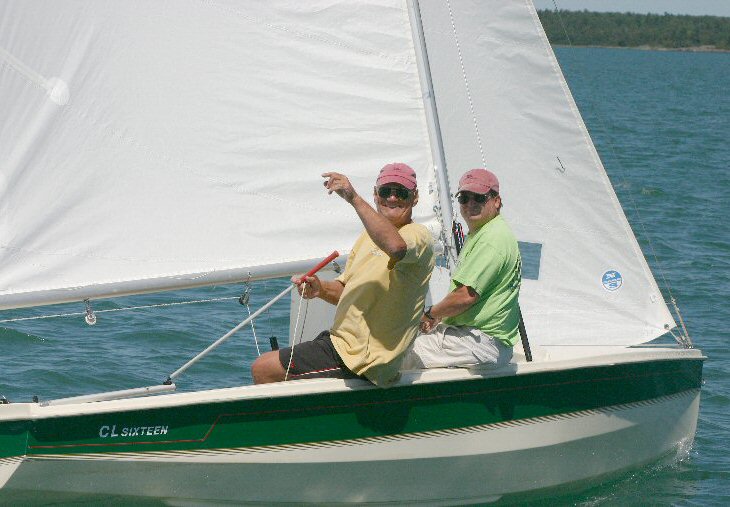
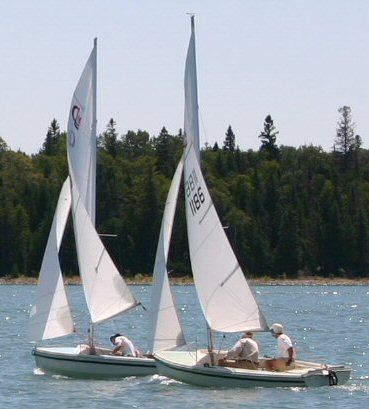
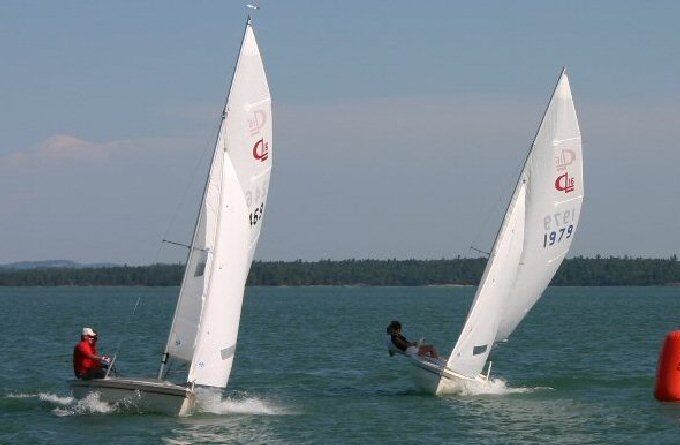 Sheeting
the sails: We do not want only part of our sail set such that its leading
edge is angled to meet the wind correctly, as is the case with CL1979's
mainsail above. Instead (99.9% or more of the time), we want the
whole leading edge to be at the same, optimum angle to the wind all the
way
up and down the sail, i.e. the entry parallel to the wind so that the
air
particles can flow along both
sides without impediment, the way CL2469 has it on the left above.
Fortunately, when the boat is
closehauled,
such an ideal angle of the whole length of the entry is easily achieved
with the sheets (and, when overpowered, the vang) - as
you are about to see.
... |
|
Sheeting the jib: The "and now for
something
completely different" department. To the best of my knowledge,
the
following is to be found nowhere else in educational sailing
materials. The latter
worry about the ideal fore and aft position of your jib sheet fairlead,
usually where an imaginary line drawn from the mid-point of your jib
luff through the clew grommet meets the deck (or seat). My belief has
come to be that such lead location is not crucial and that fiddling
with it
takes up time that could be better spent on almost anything else.
Here's what happened:
While Mike McNamara, several times Wayfarer (and
Albacore) World
champion, was coaching us in 1990, he had us tip a rigged Wayfarer on
its side, and
asked one of us to sheet the jib in to closehauled. "Now," said Mike,
"watch what happens to the upper leech when I pull the sheet in another
inch." Sure enough, the upper jib leech moved inwards 5 to 6 inches
along
the spreader. Mike's point of course was that small jib sheet tension
adjustments
have a major effect on the sail when sailing closehauled.
But if that is the
case, I then wondered, will it really matter much,
where on the track I have my lead? Because upper part of the
sail comes in more than the lower when you're closehauled, will there
not come a point where the upper and the lower part of the sail are in
balance at the same optimum
angle to the wind. For example, if the upper jib is twisted off to
leeward too much, I can sheet in more. As I do, the upper part of the
jib is being brought in more than the lower part, and eventually the
excess twist will be removed, and the whole entry will meet the wind at
the same angle. And this will happen regardless of the lead's position
on its track. Sheeting in from further forward just means that I'll
need less tension to reach the balance point because I'm pulling down
more directly on the
leech and the upper part of the jib. By the same token, moving the lead
further aft just means
the jib foot will be in pretty tight by the time the upper part of the
jib catches up.
For
what it's worth (in
my experience, nothing), moving the lead forward means you'll
be sailing with the foot of your jib progressively fuller (more
curved), and vice versa if you move the lead aft.
 On W3854,
Marc and I have not moved our jib lead position
from its position just forward of the thwart on the inside board of the
front bench in years, regardless of wind conditions. In 2010, I finally
removed all the unneeded jib lead track (see photo above) and there
have been no problems with this set-up. As mentioned above, what we do instead of
moving the lead is to sheet in
until the upper jib luff ticklers show luffing at the same time as the
lower
ones. If the top ones show luff while the bottom ones are showing
perfect sail
trim, the top needs to come in. So the crew sheets in a small amount
and the
top comes in more than the bottom. The helm keeps steering to the
bottom
ticklers, while the crew checks and keeps adjusting the sheet until the
upper
and lower ticklers are "in balance". By the same token, if the top
ticklers show stall while the bottom ones are showing perfect sail
trim, then
the sheet needs to be eased slightly. Again, the helm keeps steering to
the
lower ticklers while the crew works to get the ticklers into balance.
Mike
McNamara told us his crew basically never cleats the jib upwind since
he is
constantly working to fine tune this balance. Our experience has been
that once we
find the balance, it's perfectly fine to cleat the jib there. We then
adjust only if there is
a
significant change in wind velocity. Or, if we don't like our speed,
then we are definitely in
doubt and hence let it out (a smidgen!)
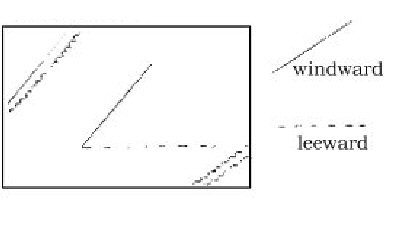
 Before Mike
told us about this upper and lower tickler
balance, we were achieving the same thing with a tickler attached to
the jib leech
near spreader height (see attempted
diagram of our ticklers system above). We still use this jib
leech tickler in light airs when it is easy
to get a
look at (i.e. we're not hiking out). The very simple principle here is
to sheet
in until the leech tickler is on the verge of getting sucked forward
behind the
jib leech, then ease out half a smidgen. This allows us an easier, more
accurate read than trying to compare the degree of luff or stall in the
upper and
lower ticklers. Both methods do the same job equally well. But the
leech tickler
is great for telling you exactly when you must not, under pain of death due to
slowness, sheet in any further. Again it is better to sheet too loose
than too
tight. But it is, of course, best of all to sheet in as much as the
leech tickler will let you
get away with, i.e. to not waste any drive from your upper jib by
having it, in
effect, luffing a bit.
Afterthought:
On a W or CL, it seems to make little
difference how far inboard you have your leads. We had ours on the deck
for
years in the 70's and still did not hurt appreciably for pointing
against those who
had already moved
their leads inboard to the benches. We did ultimately move them
inboard which common sense says should let us
point just that tiny little bit higher.
...
|
|
Sheeting the main: Little-known fact
#2: A
boat
points on its mainsail leech. I don't know exactly
why, but Mike Mac
confirms it, and that's good enough for me. This concept is
counter-intuitive, but I find it to be most
definitely true. The tighter the main leech tension you can get away
with, the
better distance you'll make to windward. I find that when
we sheet the main in a
bit harder once we are up to speed, we make better distance to windward
relative to boats who do not make this change.
Another basic point -
probably related to angle of the leech to the centre line of the boat -
is that
you never want to move your traveller off to leeward even a few inches
(in W's or CL's, at least).
That kind of
stuff kills pointing and should be reserved for survival conditions of
huge
waves and howling winds, where pointing has become a relatively low
priority.
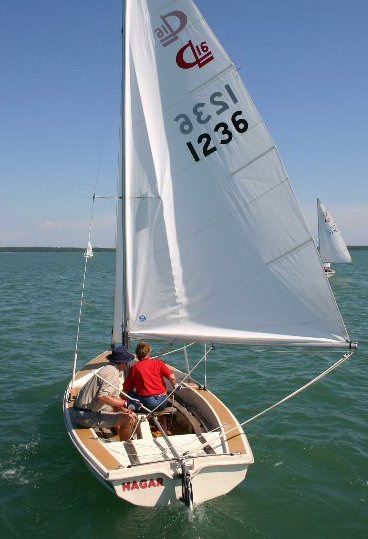
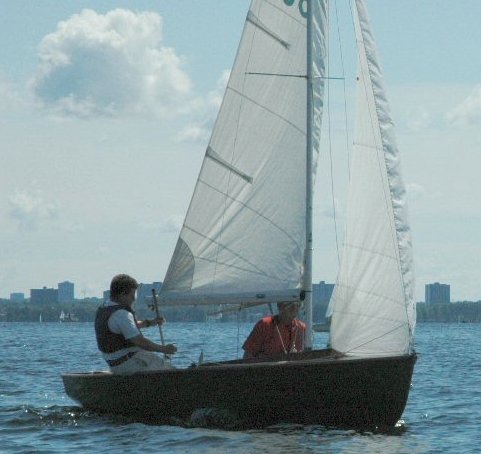
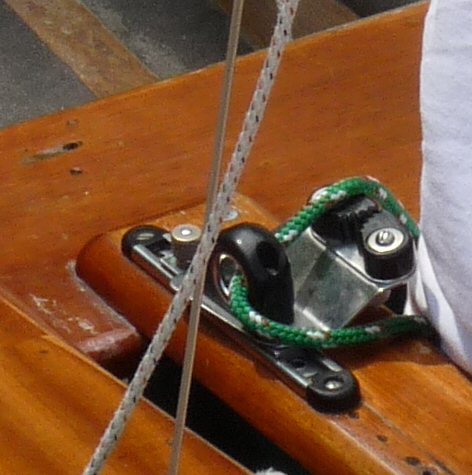
 In Wayfarers,
most people avoid this "keeping the traveller centred" problem
altogether with a bridle
(see photo above).
Remembering that being able to get adequate leech tension is crucial to
optimal pointing, we must ensure that the bridle is not too long, i.e.
we don't want to reach the "block to block" position while useful leech
tension
can still be added. In so many words, err on the side of having your
bridle too short!!
   On W3854, we have our
bridle set to a length so that we reach the block-to-block position
just before we get
overpowered and have to start using the vang.
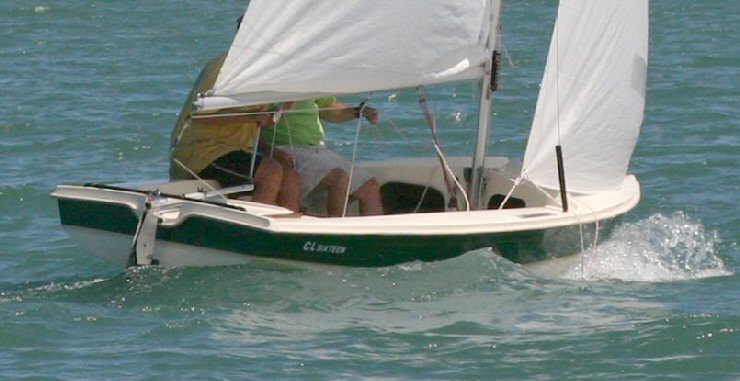
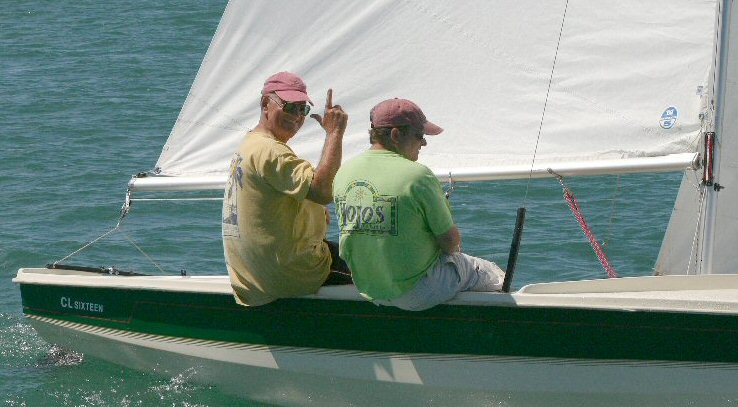
In the top photo above, note that we are getting close to
being block to block by the time we are
both on the windward deck, while in the middle picture, we are sitting
out and have sheeted in as much as this bridle will permit (block to
block). In the photo immediately above (that's Marc steering and me crewing) we
are again sheeted block to block and on the verge of being overpowered.
Should the wind increase, it will be vang time, but more of this later.
  Bridle bonuses. Besides
automatically ensuring that we are always sheeting (virtually) to the
centreline of
the boat (which is best for pointing), the bridle does two useful
things:
1. it allows us to sheet almost to the centreline in lighter winds without the excessive downpull that would hook the leech too far to windward if we tried to get the boom in to a similar position working from the traveller, and 2. it gives us a very easy read on mainsail position, i.e. do we have one inch, two inches, three inches between blocks (above right) which is far easier to see than the difference between say 30, 31 or 32 inches between the block on a traveller and the block on the boom (above left). So, how do we know when the main
is sheeted in just right? Our instrumentation here is also
low-tech and inexpensive:
one leech tickler near - but not right at - the upper batten (where it
has
more
stitching to get caught on). Perhaps the easiest way to illustrate how
we use
this tickler is to go through our routine as we sheet back in while
coming out of a tack.
On the premise
that it is always less damaging to undersheet than to oversheet,
especially
when we've already slowed due to the tack, we always undersheet both
jib and
main as we complete our tack. (Note: Such undersheeting is also a
desirable buffer against capsizing when you're tacking in a blow!) With
luck and good crew/helm teamwork, helm and crew
then
both sheet in at the same time (which, as a bonus, gives us a nice
little nudge when we need it the most). The crew sheets in as outlined
under
"sheeting the jib" above, although we tend to use easier visual
references for short-cuts to start with, like how much of a gap was
there
between jib foot and V-shaped coaming on the last tack (see series of three bridle pics above),
etc. The helm,
meanwhile, sheets in until the leech tickler shows signs of wanting to
hide to
leeward of the leech. Of course, on a normal day, with reasonably
consistent
winds, I will have observed how big a gap should be left between the
blocks to put us into what can well be called first gear, and I can immediately
sheet that far in without having to to look up at the main leech
tickler.
This is especially useful in high-stress racing situations.
Let me give you the gears:
When the boat has slowed
down for any reason (such as tacking, motor boat or other waves,
disturbed air,
too much pinching, etc.), it first and foremost needs to get moving
again. And
sailing with the main leech ticker nicely streaming aft (but on the
edge of getting sucked behind the leech) is the sailing equivalent
of driving in low gear. When do we shift to a higher gear? Exactly!
When the
boat has regained good speed for the given wind strength. And how do we
gear
up? We crank the main in another few inches - how many depends on the
type of
boat, wave conditions, amount of wind, and so on. It's something that
has to be learned
by
trial and error on any given day. With luck, you'll be near
another beating boat against whom you can speed test, so that you
can see if cranking the main in a bit
more is helping. If it's helping the other guy, go back to first gear,
get your
speed up, and try cranking the main in a bit less the next time. And so
on. I always
do a lot
of main uncleating, adjusting and then recleating when going upwind.
Unless the
beat is in exceptionally steady winds, few waves and there is a lack of
opponents near by,
I adjust the mainsheet dozens of times on a one-mile beat.
 What if the main leech tickler refuses to
fly? If the tickler
is out of order in insufficient wind or because it has gotten stuck
due to
rain or other causes, a very valid rule of thumb is to sheet in until
the top
batten is parallel to the centre line of the boat (above).
... |
|
Trivia:
We usually do very little with our outhaul, upwind or off the
wind. Most times, we set it for the day and never touch it again,
unless we really have nothing else to do, like on those long two-sail
reaches in the Can Am Regatta
where we eased the outhaul to power up the
foot of the main a bit. (More curve equals more power.) Usually
however, adjusting the outhaul represents fiddling
time that is better spent watching wind on water, waves,
and fellow competitors, or plotting strategy - or even having a beer or
telling
jokes. For
light and heavy winds, we tighten the outhaul to
or near the max. In the mid-ranges, we
ease it a bit for a fuller lower quarter
of the mainsail.
... |
|
Bringing the wayward draft back into the
fold: Especially when you're sailing closehauled, the wind
blowing across
your sails creates
a surprising amount of friction which will blow some of the cloth aft
from its designed location of maximum depth -
especially on old sails that have gotten soft, but also on brand new
sails with
stiff cloth.
This was brought home
to me most strikingly one spring: Having just
read that the main
is supposed have its max. depth of draft about 50% aft in the
mainsail (40% aft in
the jib, I believe), I raised a brand new suit of sails with the boat
on the trailer on a calm
day, and took "draft" pictures. I was appalled to find that the main's
maximum
draft was only about 25% aft. Distressed, I phoned my sailmaker, who
chuckled and said: "We'll go
sailing next time there's a breeze, and you'll see that the wind going
across the sail
will blow the draft aft right to where it needs to be." Well! Let me
tell you. I found this well nigh impossible to believe!! But sure
enough, in about 8 knots of breeze a couple of days later, there was
the
draft, blown from quarter to half-way aft as we sailed closehauled.
What a relief!
Pursuing this line of
thought further, however, begs the question:
"What if the wind starts blowing more than the 8 knots that moved the
draft from 25 to 50% aft? Won't the draft move too far aft??" Unless
you have mylar or kevlar sails, the answer is yes, and this is where
the cunninghams ride to the rescue. The principle involved
is that if you stretch one edge of the sail,
this stretching pulls more cloth towards that edge. Thus, tensioning
the luff
moves sailcloth towards the luff, i.e. the draft further forward.
 The upshot of all this
is that when the breeze gets up enough to
push the draft too far aft in the main, we start pulling on some main
cunningham (above). This
pulls the draft back forward, God
willing, into the place half-way aft where it is supposed to be on the
main. When we use
our 1994 mainsail with its 13 years of hard use behind it, we crank on
more
cunningham and sooner on the wind scale, since its cloth is tired and
blows aft
more easily than on our "new" 2003 mainsail.
 When we use the jib
cunningham to do any luff stretching at all (see photo above), we use it
extremely sparingly.
... |
|
Vang: Upwind, we never use our vang
until we can no longer
hold the boat down without its assistance. But once we are overpowered, a
multi-purchase, easily adjusted vang is worth its weight in gold,
especially in
gusty conditions where it wants to be eased as soon as we can hold the
boat
(reasonably) flat without it, and then cranked back on just before the
next
gust hits. Controls that go to both sides of the boat where either crew
or helm
can adjust them are well worth the investment of your time and money.
See Rig
It Right for our
system.
When you are overpowered upwind, the vang
does two extremely
important things: It flattens your main
by bending the mast (above),
and secondly, but no less important,
it keeps absolutely essential tension on your main leech, letting you
keep pointing even when you
have to rag the main to spill wind and keep the boat reasonably flat.
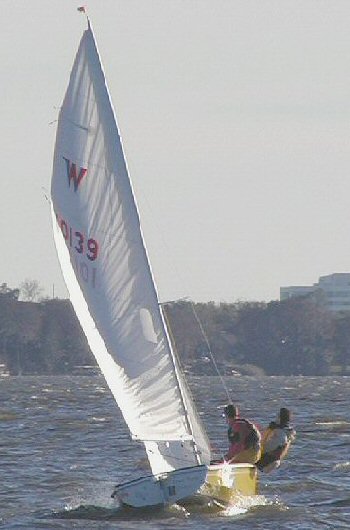  In the pictures above, notice the leech
tension we're getting (right),
even from our
"blown-out" old main, which in turn is bending the mast - all due
to applying lots and lots of vang. On the left, only the
upper mainsail is falling off, a sure sign of too little vang, and
because Richard and Michele are having to spill some wind, they're
getting too little leech tension. This hurts in two ways: pointing will
be poor, and the mast is not being bent to flatten (depower) the
mainsail.
I have found this out the hard way, by getting axed in a race, when I experimented with ragging the unvanged main, having brilliantly figured out that this would luff the top of the main first and would ease a lot of the heeling forces much sooner. Obviously that had to be faster! Alas, it took less than a single beat and our having plummeted from a great, race-leading start to 9th place, to discover that the reality did not match the theory. It would be another 10 years before Mike Mac would provide me with a reason: the boat points on main leech tension. This is in fact the main reason why Wayfarers have gone to adjustable spreaders. These can be (and are, for a blow) set to help the mast resist being bent, which in turn lets you have more leech tension in the main which has to be pulled down by the vang that much harder before the mast is willing to bend, and presto, better pointing even when the sail is well ragged! ...
|
 Everything
you should know about ticklers (telltales). Ticklers are going
to annoy you each time you sail, if you don't make a little effort to
get the right kind and to install them the best way.
Materials:
I have found that sticking ticklers onto the sail with tape (see lower ticklers in the photo above)
is the easiest but not the
best way to install them because their loose ends tend to get stuck on
the tape at
inopportune moments. Also, ticklers made from spinnaker cloth or better
yet, your favourite Elvis tape
Installation:
To start
with, I get a sailmaker's needle with an eye that will - grudgingly -
accept wool's thickness. When I couldn't find my wife's needle
threader, I put a loop of thread through the needle's eye, inserted the
end of
the wool through the thread loop, and then used the thread to pull the
wool through the needle eye. This was enough of a pain that I made
sure I cut off a length of wool (three or four feet) which was certain
to avoid my having to do more threading and to be more than enough to
make eight four-inch ticklers (6 for the jib
luff, and one each for the main and jib leech - well, if you want to
get technical, three luff
ticklers @ 8 inches/20 cm, half of that length showing on each side of
the sail.)
Jib
luff ticklers: We have three "sets" of 4-inch luff
ticklers
located at approximately quarter,
half, and three-quarter height. It is more important to keep these
ticklers away from seams that can snag them, than to have them exactly
at quarter height, etc. It is
important, however, to have all three ticklers the same distance in
from the leading edge of the jib (to avoid confusing readings). That
distance should be just far enough aft of the luff sleeve
stitching to keep tickler ends from being able to snag.
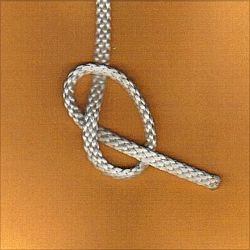 Having marked the desired
location for our three luff ticklers on the jib luff's cloth, we now
use the needle to thread the first tickler through the cloth such that
4" of loose end remain on one side of the sail. Next, we cut the wool
such that there will also be 4" on the other side of the cloth. All
that now remains to be done is to tie into the wool an overhand knot (above) close to each side of the
cloth to keep our tickler centred with 4" on each side of the sail. Note: Until I used the
blunt end of the needle as a fulcrum inside the
loop of the overhand knot, I had trouble working the knot as close to
the cloth as I would have liked.
Leech ticklers:
On our main, we use just one wind tuft (tickler), on the leech near the
upper batten. The jib leech tickler also goes at about 3/4 height, far
enough above or below the spreader to avoid entanglements as much as is
reasonably possible. The
leech tickler
attachment procedure is as follows:
1. put a figure 8 or overhand knot in
the long loose end of the wool.
2. Slide the
needle inside
the fold of cloth at the
trailing edge of the leech between two of the stitch holes, letting the
needle come out
through the folded cloth at the very aft end of the leech.
3. Pull through until the stopper knot is wedged safely inside the fold where it will not catch the rest of the tickler. 4. Cut wool to leave a tickler of the desired length |
|
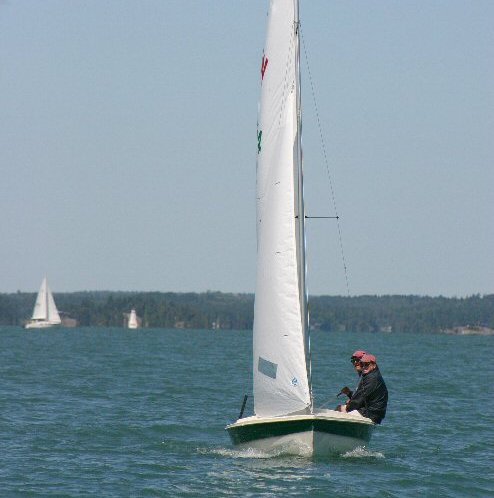
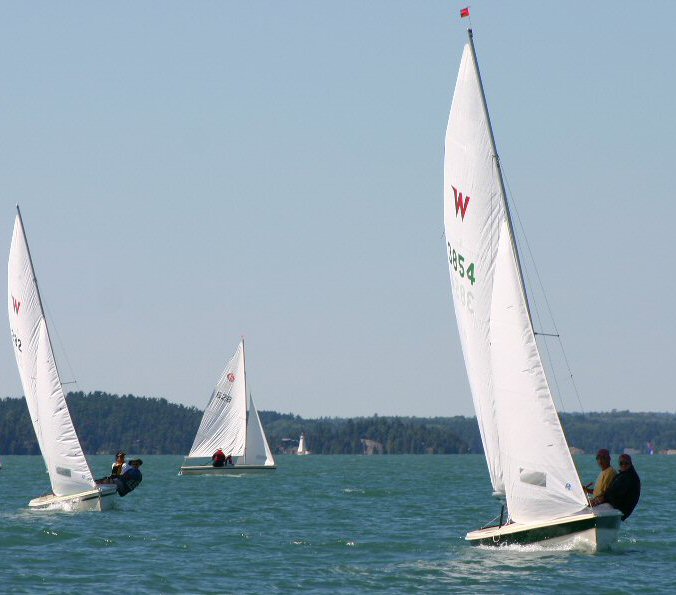
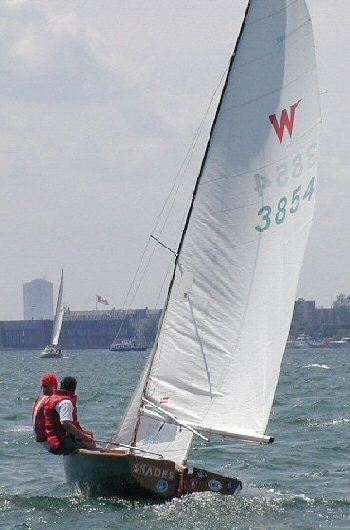
Off the
wind (and, strictly speaking, off topic): Off the wind, things are a
fair bit less complex. As far as your sails are concerned, "tuning" is
mostly a matter of letting your sails out to the edge of a luff, to
once more avoid the dreaded stall, and of using enough vang to keep the
boom level to the water line. In this regard, I will leave you with
three pictures:
 Pretty as these curves look,
none of the above sails are using the wind
to best advantage. Using enough vang to get the booms level would leave
these mainsails at a far more uniform angle to the wind. As it is here,
since neither main is luffing, one must assume that large parts of them
are oversheeted and thus stalled. Eek!! (The jibs have the same
problem, though to a lesser degree. Really keen crews in close,
two-sail races have been known to by-pass the jib lead and hold the
sheet further forward where they can add more downpull on the leech and
remove this performance-draining twist.) PS: In heavy airs, an unvanged
main adds to the danger of capsizing during a gybe because the boat has
to be turned much further before the wind can finally get around behind
the upper main and slam the main over.
 Note how Uncle Al here - to
keep the boom from skying - has tightened
his vang just before reaching the windward mark after not needing it
while going upwind. In another pre-rounding preparation. Marc has just
let off both cunninghams completely (see
wrinkles in both luffs) because cunningham tension is
undesirable on reaches and runs as can be seen in the next photo where
...
... CL1336 has the main
nicely vanged to keep the boom level but has a stretch bulge up his jib
luff that is most likely due to cunningham effect.
|