the
"balls" system
for improved
spinnaker
sheet control
This initially
complicated
but ultimately very handy spinnaker sheeting system was first noted on
some of the UK boats in the ‘89 Worlds at Vallensbæk in Denmark
where
its heavy air potential could be easily appreciated. A year
later,
it was outlined in the Danish W-Nyt by Poul Ammentorp (W239),
and
I shall try to summarize and update this system here.
The
“balls”
system requires a barberhauler (henceforth referred to as BH)
arrangement
for the spi sheet plus a pair of plastic balls threaded onto the spi
sheet
which are kept in the forward ten feet or so of each sheet end by means
of a suitable blockage such as a whipping.
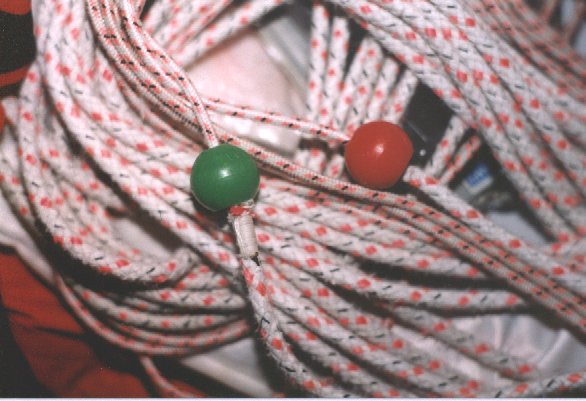
On
SHADES,
we use 6 mm. spi sheets that have a nice soft, fuzzy covering over a
Spectra
core (Marlow Ropes #LM0113, described as “SPINNAKER T/BLE
6mmPINK”)(see
photo below). At last report, this was unavailable in Canada,
and we ended up getting a 100 m. roll of it through Mike McNamara.
Al's
note 15 Nov 09: Marlow now advertises this rope on line as Excel Taper. It can be obtained
on line through Marinestore where it is referred to as Marlow
Rope Excel Racing 06mm.
.....
 .....
.....
The reason we love
this stuff
is that we can simply remove the covering from the last 10 feet or so
of
each end of our continuous sheet, and then needlewhip the remaining
cover
into a position where it makes a perfect blocker for the ball (see
photo
above)!
.....
 .....
.....
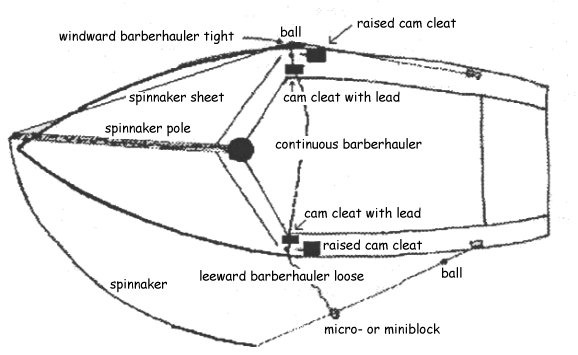
If you look at the
illustration
above you will see how our boat would look on a starboard tack
spinnaker
reach. When the spi is flying, the windward BH is always sheeted
and cleated in, while the leeward one is usually loose (but can be
tightened
to varying degrees, especially on a wild run to dampen dangerous spi
oscillations!)
In
the
diagram, the ball has slid as far aft as our whipping on the sheet will
allow it to go, and when the ball hits the BH block which is held in
position
by the cleated BH, the windward sheet can run forward no further.
The trick of course is to place the whipping such that the spi pole
will
set just off the jib luff when the windward BH is sheeted in.
(What
you need to do to locate the position for the whipping that blocks the
ball, is mark the spot where the sheet would pass through the BH on a
typical
close reach. In our case, we left a little extra sheet at each
end
because we tie our sheets on. We can always use up more sheet to
tie the knot, but too little would make life difficult!!)
In
the
situation shown in the diagram above, the windward sheet does not need
to be cleated, which saves one step during the reach set
procedure!
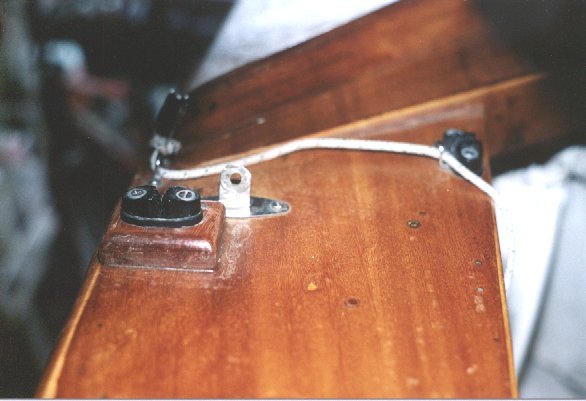
To move the pole further aft is no problem: you simply pull aft as
usual
and then cleat. We do this just aft of the shroud (see below) and
have discovered that the cleat must be raised so that the sheet, on its
way to the BH, does not angle up. Letting
it
angle up makes the sheet uncleat itself!
Note the following
components
of our system:
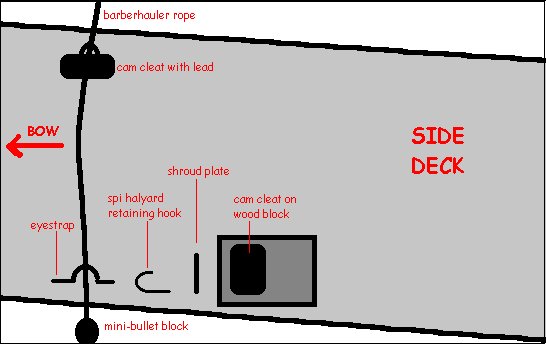
-
our barberhauler
is continuous,
i.e. it runs right across the boat and both sides can thus be adjusted
from windward. It consists of about 3 metres of 4-mil 8-plait
pre-stretch
rope. This has a Harken mini-bullet block hitched to each end,
after
passing through four eye-straps, two per side, as shown below in the
diagram
of our rather crowded side deck area near the shroud.
-
two cam cleats
with lead, two
cam cleats without lead
-
two eye straps
-
two plastic balls
(we use red
and green, RWO #R1993, R1994)
Photo
below
shows what I tried to show in the earlier diagram above.
.....
 .....
.....
Our
routine was covered earlier in the spinnaker section but
I’ll
go over it in more detail here with special attention to the
barberhauler
routine. This assumes a typical buoys-to-port
triangle-sausage-windward
course:
(a)
before the start
1.
carefully pack spi in port-side bag, ready to hoist without twists
2.
cleat port spi sheet at its marked spi-reach position
3.
stow pole on starboard side of boom
(b)
near windward mark -
at
end
of last port tack:
1.
unhook spi halyard from storage hook on port side
2.
make sure port BH is uncleated
3.
feed one metre of starboard spi clew out of spi bag and onto foredeck
while
tightening and cleating the starboard BH from the port side of the boat
at end
of last starboard tack:
1.
pole downhaul out of storage hook at forward end of boom (see Care
& Control of Your Pole)
2.
if practical, helm presets pole to correct sailing height
3.adjust
controls for upcoming reach (e.g. outhaul, cunningham, vang)
(c)
after rounding:
1.
check that it is tactically desirable to hoist - i.e. make sure that
you
will not be luffed or passed to windward during your hoist
2.
when conditions are “go”, crew takes main and jib sheets and balances
the
boat while helm hoists spi. This is especially important when the boat
is (or may be) overpowered. On SHADES, the crew regularly has to
briefly strap the jib in after the hoist in order to free the spi sheet
which catches under the jib foot. After this, the crew cleats the jib
in
an effective reaching position.
3.
once the halyard is carefully cleated, the helm takes over the
mainsheet
and balancing duties while the crew sets the pole
4.
once the pole is set, the spi should fill since its sheet was
pre-cleated.
Crew then takes over the sheet and fine-tunes the spi
(d)
at the gybe mark -
the
approach:
as helm begins to bear
away
for gybe, crew yanks pole well aft to bring (most of) spi to starboard
side while releasing leeward spi sheet, cleats in port BH, and uncleats
jib - helm waits til crew is done before completing the gybe
the
gybe:
1.
both helm and crew concentrate all energies on the gybe - the spi, with
both BHs cleated in should present no problem unless the gybe is badly
mishandled!
2.
in windy weather, the crew helps the boom over by grabbing the
vang.
Crew exerts some pull on vang without actually trying to force the boom
over until it indicates it wants to go when the pressure on the sail
decreases
significantly.
If
a capsize
is feared, the helm must do an S-gybe (i.e. pull the
tiller
briefly to port as the boom goes over) and the crew should help by
trying
to stop the boom from crashing over by resisting its momentum (i.e.
fighting
boom’s momentum by pulling on the vang once it has crossed the centre
line).
This cushions the gybe and makes the boat easier to steer out of the
gybe.
after
the gybe:
1.
helm & crew balance the boat and steer as tactics dictate (e.g. go
high to defend wind) while trimming main and jib to best effect
2.
at word from helm, crew completes pole transfer while helm drives and
balances
the boat
3.
crew uncleats leeward BH and sheets in
end
of second reach -
approaching
the leeward mark:
1.
helm and crew set sail controls and board for upcoming beat
2.
at word from helm, crew stands in front of windward jib sheet and stows
the pole. Helm may adjust uphaul for storage parallel to boom, or
do it later, as the situation dictates
3.
helm stands (briefly, if necessary!) to uncleat spi halyard and holds
it
in a light grip over his head to anticipate (and prevent)
tangles.
In a blow, the halyard can be thrown overboard to achieve the same
effect.
4.
crew quickly pulls spi down while helm exerts enough halyard
pressure
to prevent the sail from coming down faster than the crew can handle. If
this is done quickly enough, there should be no risk of the leeward
spi sheet going under the boat (which is slow!). (To
further
help us to keep from sailing over the sheet, we also have a little 4”
stainless
steel wire loop sticking out from the bow at deck level.)
Crew pulls
all slack from spi halyard and stows it around the storage hook near
the
shrouds before cleating halyard in small black clam cleat near mast. If
time permits, crew stuffs spi into bag .
at the
mark:
Having the board full
down,
playing the jib and keeping the boat flat as we round onto the beat are
the priorities - something which has to be stressed with crews who have
a fetish for neatness. Cleaning up can be done later, when you’re
settled away on a tack that you expect to hold for a while.
(f)
end of second beat and start of run:
1.
since the next leg will be a run, both BHs may want to be cleated in,
but
the windward one for sure!
2.
here the procedure differs in that helm and crew can both work on the
spi
at the same time: helm hoists and then takes both sheets to fly the spi
while the crew adds the pole to the mix. If you have remained on
starboard tack, this will be difficult because the pole is wedged
against
the shroud on the leeward side of the boom, and will require the helm
to
sheet in a bit! The crew wants to add the pole carefully so that
the spi, being so masterfully flown by the helm, will not be made to
collapse!
3.
once the pole is attached, the helm can cleat the windward sheet in an
appropriate position while the crew takes over the sheet
4.
coordinating their motions, helm sits/stands to leeward, crew to
windward
5.
in light airs, helm holds boom out and gives boat a windward heel to
help
the spi set better
(g)
run-to-run gybe:
In
true
survival conditions, I would cleat both BHs, and have helm and
crew
both concentrate on the S-gybe with the crew on the vang with priority
#1 being capsize avoidance.
In
all
other cases,
1.
the helm stands and steers with his knees while he grabs the leeward
sheet
and waits for the crew to pass him the windward one. Both sheets
are held in the part that comes directly from the spi!!
2.
helm steers through gybe with his knees (S-gybes require some practice
here!) and tries to keep the spi flying while avoiding the boom (again:
practice makes perfect!)
3.
crew cleats jib on new tack, switches pole as quickly as possible
because
the boat is
a)
stern-heavy while helm steers with knees
b)
under less than optimum control
4.
helm now cleats windward sheet from where he’s standing, grabs the
tiller
and moves forward to his usual position to get the transom back out of
the water. Meanwhile, the crew takes over the sheet.
(h)
the end of the run:
The take-down can
(usually)
be quite relaxed since it is often possible for the crew to stow the
pole
quite early while the helm plays the sheets until the last dog is
hung!
Thereafter, the take-down procedure is the same as before!
|