| Having had so much fun with his trailer photos,
your Uncle Al has decided to do a photo essay on his rudder set-up after
the following e-mail from Kevin Mast (W3639):
----- Original Message -----
Hi again! Just re-read your WIT Rudder Use section... I think that as the dummy that I am, I may need a picture or diagram to show me how to keep my rudder down! If you find the time... Many thanks again for all your help!
|
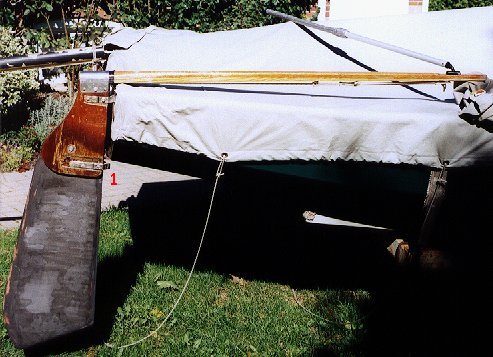 |
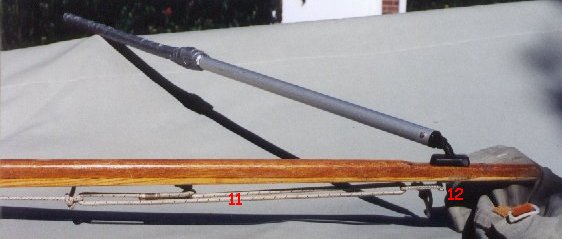
| Too lazy to take off the cover and trailer lights
board, Al has hung the rudder/tiller combo in a parallel position. Note
how the rudder blade is fully down (1). This is very important as
even a slight aft angle will increase the effects of any weather (or lee!)
helm dramatically, which in turn not only makes the boat much harder to
steer and control but also puts unnecessary strain on the rudder and hastens
along the day that it will break!
In the original design, the blade was angled aft such that the bottom edge was level. This was good for sailing in tidal waters, etc. because, if you hit bottom with the rudder, you automatically got only a glancing blow. Nowadays, we sail with the blade angled partly up only if we are sailing through weed infested waters in relatively light winds. Of course, sailing with the blade partly up does force you to be extremely aware of how much helm you have and to minimize it!! .. |
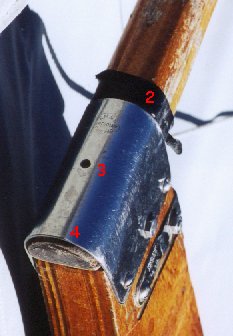 |
| 2. A good snug fit between the tiller and
the cap on the rudder head is crucial for your peace of mind while steering.
3. Most boats still use the original pin through the hole shown here to keep the tiller in place. This can be useful if you unhook the tie-down (see item 5 below) as you approach shallow water prior to beaching. On our boat, the tie-down also keeps the tiller in the rudder head cap, and a couple of times, my tiller has come out after I unhooked the tie-down. Surprise!!! Still, I prefer to sail without the pin and thus keep the tiller wedged into the rudder head as much as possible which gives the snuggest possible fit. 4. Using the above system eventually (after only 15 years!) left me with a cm. or two of tiller sticking out at position 4. Faced with the choice of bulking up that end of the tiller or cutting the excess off, I chose the latter as being less work - and besides, I was really pleased with the snug fit I was getting (absolutely no play). .. |
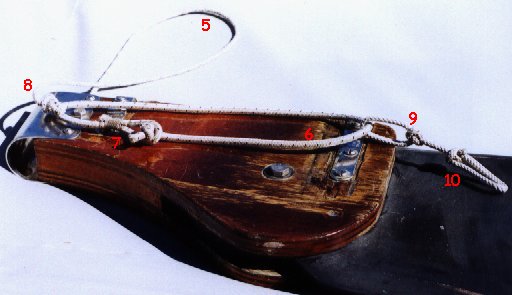 |
| 5. I replaced the original tie-down rope
with 3-mil. 8-platt pre-stretch line (which I don't think Marlow makes
anymore?) - any 3-mil, low stretch line will do.
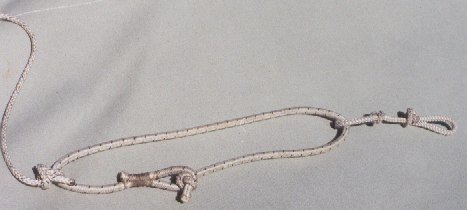
6. I have laid my quarter-inch (6 or 7 mm) shock cord buffer arrangement on my rudder head to show its relative length (about two feet of shock cord in total) 7. No reason for this fancy arrangement of creating a loop, other than I happened to have two feet of new shock cord with one end already seized into a loop, lying around. I tried just putting the stopper knot (overhand knot, pulled really tight using pliers to grip the short end!), and then inserting it into the loop as shown above. To my pleasant surprise, this set-up has never accidentally come undone or needed to be replaced in well over 10 years! It still has all the stretch I need. 8. To connect the rope tie-down to its shock cord buffer, I used a very short bowline which keeps the shock cord more or less in the above position - with the connection spot (7) away from either end. 9. I had originally intended to just hook the shock cord over the hook under my tiller (see item 12) but found this difficult, given that I wanted the shock cord stretched to almost its maximum. Thus, I attached the bit of line you see here (9, 10), intending to hook the shock cord over the hook in this way. Shortly thereafter, I decided that I could save wear and tear on the shock cord by hooking the rope loop made by the bowline (9) over the tiller hook (12), and this had worked great over the years! 10. The other bowline loop gives me something to pull on when I want to put bowline 9 under its tiller hook. This is a necessity since - to help keep the blade angles fully down - the tie-down rope must be shortened until the bowline at 9 will just barely make it over the tiller hook. A further use for this second bowline is that when I want to sail with the rudder blade angled part way up to help weeds slide off the blade, I can hook this bowline over the tiller hook and then reach out the back of the boat, grab the rudder blade, and angle it aft as much as it will comfortably go - about 30 degrees. .. |
 |
|
|
 |
| 11. The shock cord loop at full stretch...
12. ... with the rope bowline (9) looped around the hook under the tiller, and the other bowline (10) hanging loose .. |
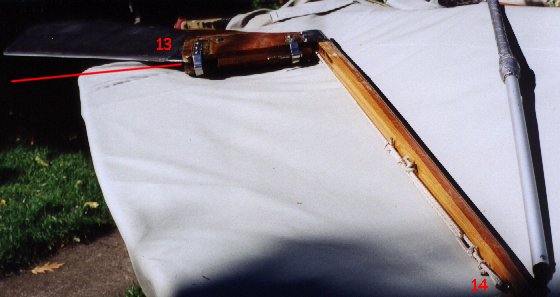 |
| 13. The blade can be angled aft about 30º
using...
14. the front bowline (see #10) .. |
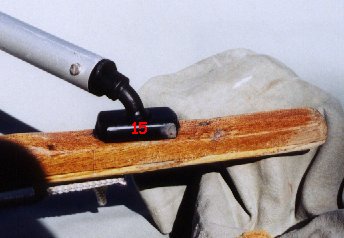 |
| 15. What a fine day it was for my tiller
when I discovered this flexible joint (RWO part # R 0840, I believe, according
to my Pinnell & Bax catalogue)!!!
For a day or two, the extension wanted to stand straight up, but after
that, it has been just great! Mine only lasted 4 or 5 years but it's cheap
to replace. This is an item you should check regularly for wear and tear,
especially as it gets on in years!
.. |
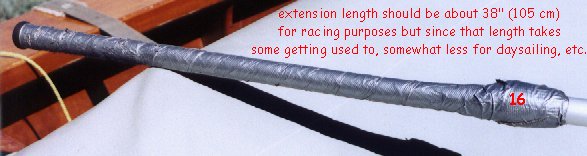 |
| As I recall, Mike Mac recommended a 38" tiller
extension. In any case, the extension should be as long as you can get
away with and still tack without hopelessly tangling the extension in the
mainsheet - either where it comes down to the transom or where it comes
down to a centreboard-mounted mainsheet swivel cleat!
16. I thought I would beat this problem by getting an adjustable, telescoping extension. But after it came loose a few times at very inopportune moments, I decided to tape it into its optimum length, a tape job that I subsequently extended when I decided I didn't like the feel of the rubberized grip that had been provided. .. |
|
|
| It is crucial that pintles
and gudgeons on both transom and rudder be strong and reliably fastened
since failure here will be bad news indeed!!
17. The pintle shown here (and the gudgeon above that is not shown) is made by Ronstan and is very strong. A Fireball friend recommended these to me, explaining that he had run aground at full speed and that rather than the fittings breaking, his transom ripped open. I can vouch for this, as I did the same thing in my Fireball at Fanshawe in 1975. My kind of rudder fittings!!! 18a. Especially on boats that no longer have a traveller to keep the rudder from coming off its pintle and gudgeon, the Ronstan transom pintle has this little plate that swivels. In 18a it is positioned such that the rudder gudgeon will slide over and past it. .. |
|
|
| 18b. Once the rudder is hooked on to the
transom, the plate is flicked into a more horizontal position and is virtually
fool-proof in keeping the rudder attached! Other systems should have some
kind of rudder retaining clip mounted on the transom near the top of the
pintle!
.. |
 |
| Since the rudder is subject
to a fair amount of vibration and movement, it is crucial to have all fasteners
solidly attached and to check these fastenings anytime you are about to
attach the rudder to the boat.
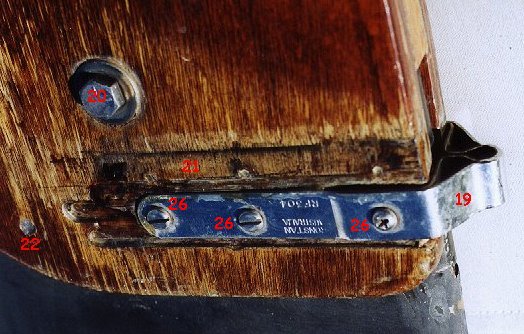
19. the rudder gudgeon 20. The rudder blade pivot bolt needs to be tightened just short of making the blade impossible to pivot. The nut then needs to be locked into that position. It is essential that your rudder blade fit snugly into the "cheeks" of the rudder head. Class rules are about to be changed to allow packing pieces to permit such a snug fit: Packing pieces of equal thickness applied to each side of the rudder blade shall be permitted. They shall not extend below the bottom of the rudder stock. The total thickness of the packing and blade shall not exceed 22mm. 21. You will note that not only is my rudder head due to be re-finished but also, that my rudder head was not an exact fit with the gudgeon and I had to rout the wood a bit to achieve a proper fit. You will see that Uncle Al is not a carpenter! 22. If you really want to make sure your rudder blade stays down, you can do what I did before I came up with the tie-down system outlined earlier on this page. It is legal to put a wooden dowel through both rudder head and blade because it still allows the rudder blade to come up when it hits something (It works - as we found out when we hit rocks on Trout Lake in 1987!) 26. Fastening the gudgeon to the rudder cheeks securely is a tricky business. The screws needs to be as long as possible without interfering with the swivel capability of the blade (about 1/2" or 12 mm in my case). What I finally did after losing several of these screws while underway, was to use screws that were about one millimetre too long, took them out of their holes again and filed off the excess length. Then I re-inserted the screws, having first coated them with epoxy glue. This holds them in fairly well. .. |
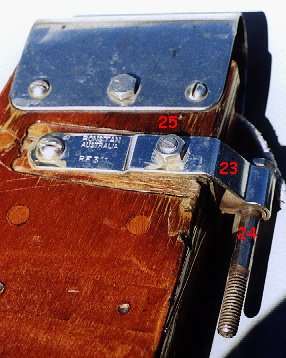 |
| 23. the rudder pintle
24. About ten years ago, I lost the pin in pintle at Harbor Beach and got towed in by a kind fisherman. In the emergency, I discovered a stainless steel bolt in my tool box that fit in the vacated hole quite nicely. I glued it in with 5-minute epoxy and was out in time for the next race! I had intended to replace that fitting but never did get around to it - and now I won't bother because this jury rig has worked well for over a decade! 25. No problems with needing short fasteners here. I just put a solid bolt through from one side to the other of each hole. |
| Of course, I haven't mentioned alignment of the fittings. Not only do the transom gudgeon and pintle need to be centred on the transom and vertically aligned, but of course, they also need to match up with pintle and gudgeon on the rudder such that a maximum immersion of rudder blade is achieved without ever dragging the rudder head cheeks through the water! |