|
RIG
IT RIGHT: the MAIN HALYARD
Rationale:
The main (and jib) halyard should be made such that when the sail is
fully
raised, the supporting part of the halyard (between the shackle at the
sail head and the point where it is fastened) is wire.
Suggested wire:
- main halyard: about 22' of 3/32"
7 x 19 stainless steel wire (more
than 22' if your halyard exits at the foot of the mast!)
- jib halyard: about 21' of 1/8"
7 x 19 stainless steel wire (more
than
21' if your halyard exits at the foot of the mast!)
A thin (#4
Dacron braid) rope tail is added only to enable the wire to be
pulled
into the
correct position where it can be hooked onto a halyard rack such as Holt
Allen #23671 (see image below)
This leads to well set sails (less
stretch in
wire) and does away with the need for cleats on the side of the mast
(which
are always catching things when you least need it!)
When rigged this way, both main and
jib
halyards bypass the double block that came with the older-style Proctor
masts about one and a half feet below the gooseneck. Instead, they come
down the mast groove past the gooseneck and hook onto their rack, lever
or magic box hook just below the gooseneck This saves wire and the
aggravation
of trying to pull a swaged loop past the sheave in the block.
Installation:
1. Swage a loop lined with a thimble
into
one end of your new 3/32" halyard wire.
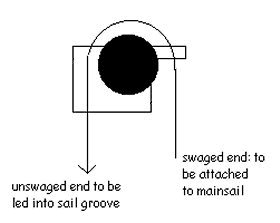
2. With the mast down, feed the
unswaged
end of the wire through the sheave box at the mast head as indicated
below:
3. Now you can often just lay the wire
part
into the sail groove. If it does not go in easily, take a screw driver
and gently wedge the two sides of the sail groove apart and let the
wire
fall in.
4. Put your mainhead shackle into its
swaged
loop and have a helper hold it in the 'main full up position', i.e.
such
that the shackle pin is about 1/2" below the lower edge of the black
band.
5. Gently tension the wire and lightly
'kink'
it around the middle hook of your halyard rack to mark the correct
position
of your loop.
6. Cut off excess wire, leaving enough
to
accommodate a 4" loop which you will now create by swaging.
7. If you use #4 Dacron braid line
(cheap!!!)
as a halyard tail, you can simply tie this onto the 4" loop with a
bowline.
#4 line runs nicely, even up the mainsail groove, and if its thinness
makes
you nervous, soak the part where rope meets wire with 5-minute epoxy
glue
to keep the #4 line from fraying too easily. You'll need less than 25'
of this line. My apologies for not knowing more precise dimensions!
8. Now pull the swaged loop down near
deck
level and stow the main halyard as usual.
If you
already have
the right halyard but wish to add a halyard rack...
Raise the mainsail until it is in
perfect
position (sail head at lower edge of upper black band). Mark the
location
of the lowest part of the wire loop attached to the tail. The middle
hook
of your rack should be at the level of this mark.
The rack may be riveted onto the side
of
the mast groove (I prefer the port side) or you can make the
system
neater by removing about six inches of mast groove in the appropriate
location
and riveting straight onto the aft face of the mast. There is some
question
though as to how legal the latter is under the Class Rules nowadays.
Once the rack is riveted onto the
mast,
check again to see which hook should be used so that your sail head is
right at the black band. As long as you continue to use the same sail,
shackle and halyard, your sail will now be in perfect position each
time
you hook the lower loop onto the appropriate hook.
|