|
RIG
IT RIGHT - the JIB HALYARD
Halyard wire recommendations:
- main halyard: about 22' of 3/32"
7 x 19 stainless steel wire (more
than 22' if your halyard exits at the foot of the mast!)
- jib halyard: about 21' of 1/8"
7 x 19 stainless steel wire (more
than
21' if your halyard exits at the foot of the mast!)
Rationale:
This halyard should be 1/8" wire since
it must take a much greater strain than the main halyard. It will be an
equal partner with the sidestays (which you will note are also 1/8"
wire!).
I am assuming here, that you are replacing an old jib halyard, and that
you already have a tensioning device installed.
Installation:
1. Swage a loop lined
with
a thimble into one end of your new halyard wire. The length of this
wire
will need to be around 20', depending on the luff wire length of your
jib
and how you will get to your tensioning device. On SHADES, our
halyard
comes straight down to the magic box which is about a foot below the
gooseneck.
If you lead your halyard out the bottom of the mast at centreboard
level
and then come up or aft to your tensioning device, you will, of course,
need more wire.
2. Take the mast down,
and
thread the un-swaged end of the wire through the jib halyard entry
block.
On the old-style Proctor masts, this wire then needs to be encouraged
to
slide down the mainsail groove towards the gooseneck. On Abbott masts
or
the newer Proctors, where the halyards are internal and exit at the
foot
of the mast, the blocks at the foot will have to be moved to thread the
wire through.
3. Get your jib out
but do
not attach its tack to the stemhead fitting. With the mast still down,
shackle the thimbled loop of the halyard to the head of the jib, making
sure that the other end of the halyard is prevented from going back
into
the mast (get a friend to hold it or tape it securely to the mast).
With
the loose halyard end still secured (!), put the mast back into its
upright
position. Now attach the tack to its proper spot. Take the loose
halyard
end and pull the halyard as tight as you can reasonably get it
by
hand. Mark the spot where the wire goes around the hook of your
tensioning
device. (I do this by slightly
kinking the wire in that spot.)
4. Undo the tack of
the jib
so that you can pull more halyard out of the mast. This makes the
cutting
and swaging a lot easier. Cut off enough excess wire to leave about 3 -
6"
of wire after the 'kink' or other such mark. Now swage a 3 - 6" loop
into the
'loose' end of the halyard.
5. If you use #4
Dacron braid
line (cheap!!!) as a halyard tail, you can simply tie this onto the
loop with a bowline. #4 line runs nicely, even up the mainsail groove,
and if its thinness makes you nervous, soak the part where rope meets
wire
with 5-minute epoxy glue to keep the #4 line from fraying too easily.
You'll
need less than 20' of this line. My apologies for not knowing more
precise
dimensions!
6. Now you can haul
the jib
down and stow your jib halyard as usual.
the bottom of the loop
should
be about a foot below the bottom black band (i.e. gooseneck in normal
position).
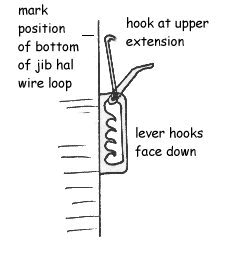
Mark the position of the bottom of the loop on the mast.
If
you already have the right halyard but wish to add a tensioning
device...
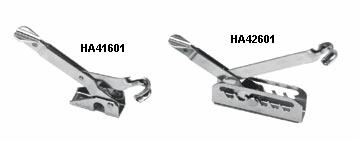
| Your
Highfield Lever (Holt-Allen
42601) or Magic Box (Harken 116) must be attached such that its hook in
its uppermost extended position (see diagram on right) matches the
position
of the halyard's bottom loop when the jib is hoisted. There are
numerous
possibilities for attachment. To attach the tensioning device directly
to the extension of a sail groove, the best set-up I've seen is the use
of bolts with square nuts that have the corners turned inwards. This
lets
them really grip the inside of the groove ans prevents the lever or
magic
box from sliding along the groove under the considerable pressure that
will be exerted.
If you are
going through the
main body of the mast, beware of screws' points getting caught on line
that run up and down the innards of the mast. You need to file the
self-tapping
screws accordingly or do as I do and use Monel rivets.
|
 |
|
There is a
picture of the Harken #116 Magic Box on line
but they've blocked it from being copied - dumb, but there you have it!
|
Length
Adjustment: As many of us have already
found
out the hard way, a wire halyard that is the absolutely perfect length
for our current jib may suddenly be an inch or two too short or too
long
for the next jib. To avoid the need for new halyards or a new placement
for the magic box or lever, we have added a shroud plate (see
illustrations
below) to the sail end of the halyard. The shackle goes into the
single
hole at the left end (below, left) while the swaged eye of the
halyard
slides in from the right end as many holes as is necessary. With our
current
jib, that is 6 holes in, which allowed the chain plate's sides to gape
a bit and left me with the fear that the spi halyard might get caught
in
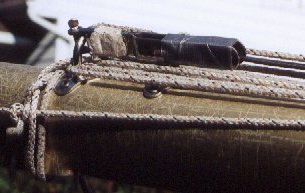
there. To avoid such a possibility, and to make sure we don't lose the
horseshoe-shaped part of the shackle when the pin is out, we have taped
up the entire sides (but not, of course, the ends!) of the shroud plate
(which I believe is Ronstan #RF2331, or so it says in my local
catalogue...)
as you can see in the photo of our mast stored for trailering, on the
right
below:
..
|